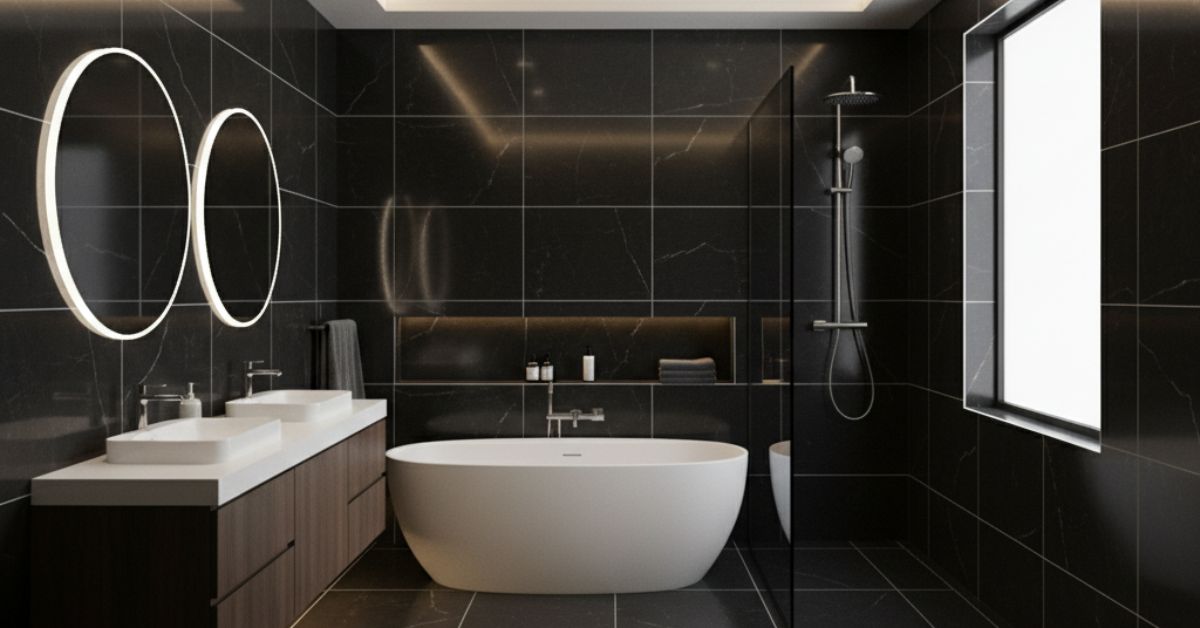
Black bathroom tiles create instant impact. They add depth, contrast, and a modern edge. Many worry about slips, streaks, or rooms feeling smaller, but the right finish solves these issues.
Glossy tiles reflect light on walls, while matte or textured tiles give safe grip on floors and showers. With smart choices, black tiles bring both luxury and function.
This guide covers safety ratings, finishes, grout colours, layouts, and care tips to help plan a bathroom that looks bold and stays practical.
Black Bathroom Tiles Safety & Performance
Slip Resistance (R-ratings)
Bathrooms are wet, so slip safety comes first. Tiles carry R-values that show grip. For most bathroom floors, R10 feels secure. In showers, R11–R12 adds extra hold under bare feet. R13 is very grippy and usually reserved for heavy-duty or outdoor areas. Smooth, glossy tiles look great on walls but feel risky underfoot when wet.
Checklist for safe choices
-
Floors: R10 or higher
-
Shower tray: R11–R12
-
Outdoor shower zone: R12–R13
Water Absorption & Material Picks
Moisture builds fast in bathrooms. Dense tiles last longer and clean more easily. Porcelain is my default because it absorbs ≤0.5% water. That keeps floors and shower areas stable over time. Ceramic suits walls and light-use zones but is less dense. Natural stones such as marble or slate look rich and tactile, yet they need sealing and more care.
A proper fall to the drain matters. Standing water causes marks and raises slip risk. A gentle slope keeps surfaces dry and safe.
Ventilation & Lighting
Steam without airflow leads to streaks, especially on dark tiles. A quality ventilation fan reduces damp and helps tiles dry fast. Lighting sets mood and affects maintenance. Warm light around 3000K softens black and adds a cosy feel. Cooler light near 4000K sharpens edges and looks modern. I test samples under both so the final scheme matches the room.
Quick tips
-
Fit a fan near the shower to cut condensation
-
Place downlights close to walls to bounce light off glossy tiles
-
Mix warm and cool sources for balance
Best Materials for Bathrooms
Porcelain (default choice)
Porcelain gives the strongest mix of safety, style, and low care. It is dense, stain resistant, and easy to clean. On floors, I use matte or textured finishes for grip. On walls, glossy porcelain brightens the space and reflects light around mirrors and vanities. One material can handle the entire room with different finishes by zone.
Ceramic
Ceramic works best on walls and splashbacks. It costs less and comes in many shapes and patterns. I avoid it for busy floors or showers, as it is lighter and chips more readily than porcelain. For a decorative feature wall, ceramic still shines.
Marble & Slate
Marble brings classic luxury with unique veining. Slate adds natural texture and built-in grip. Both look superb, yet both need more care than porcelain. Sealing, gentle cleaners, and routine upkeep keep them looking right.
Stone care
-
Seal on install and reseal on schedule
-
Use pH-neutral cleaners only
-
Wipe soaps and hard water quickly to avoid etching
Porcelain often wins for family homes due to lower upkeep and better long-term performance, but stone remains a fine choice when the brief calls for a natural, high-end look.
Finishes and Grout Choices
Glossy vs Matte
Finish sets mood, light, and upkeep. Glossy black tiles look crisp on walls and reflect light, making small rooms feel brighter when paired with good lighting. They need regular wiping to keep marks away. Glossy is not ideal for wet floors as it can feel slick.
Matte finishes calm the space and hide water spots. Matte porcelain on floors feels safer underfoot, especially around the shower. Walls in matte reduce glare from strong downlights. Both finishes can work in the same room: glossy at eye level and matte underfoot.
Quick steer
-
Walls needing lift → glossy porcelain
-
Floors and shower surrounds → matte porcelain
Textured for Floors and Showers
Texture adds real grip and is essential where water collects or where bare feet need hold. A textured porcelain tile with an R11 rating keeps shower trays and wet floors secure. The surface still cleans well with warm water and a soft brush. Samples underfoot confirm comfort and traction before ordering.
Targets
-
Main bathroom floor → R10 or higher
-
Shower base or walk-in zone → R11 to R12
Grout Colour: Black, Dark Grey, or White
Grout sets the outline and influences cleaning. Black grout blends with black tiles and hides stains, giving a seamless look. Dark grey softens the contrast while keeping maintenance simple. White grout creates a bold graphic grid but demands more upkeep.
Joint width shapes the finish too. Rectified porcelain looks best at two to three millimetres. Narrow joints feel premium and reduce dirt traps. Cement-based grout benefits from sealing, while epoxy resists stains in heavy-use zones.
Fast picks
-
Seamless look → black grout, 2–3 mm joints
-
Softer contrast → dark grey grout
-
Graphic style → white grout, higher clean routine
Layouts and Patterns for Small vs Large Bathrooms
Large Format for Fewer Grout Lines
Large tiles calm the eye and make spaces feel open. Sizes such as 600 × 1200 mm reduce joints on both walls and floors. Fewer grout lines mean easier cleaning and a modern finish. A level substrate is vital, and planning cuts keeps margins even.
Uneven bases cause lippage, so levelling clips are essential for large tiles. The result is a smooth plane that suits underfloor heating and low-profile trays.
Fit notes
-
Dry lay the first course to confirm joint balance
-
Use levelling clips on tiles longer than 900 mm
-
Keep falls consistent in wet zones
Subway, Hexagon, and Herringbone for Accent Walls and Niches
Pattern adds personality without clutter. Subway tiles in black feel timeless, whether stacked neatly or laid in a brick bond. Hexagons bring a modern graphic edge, often used on feature walls or shower panels. Herringbone layouts add energy and rhythm, working best with plain floors.
When to choose each
-
Subway for classic order
-
Hexagon for modern geometry
-
Herringbone for dynamic flow
Niche, Trim, and Edge Details
Details complete the look. A tiled niche keeps bottles off the floor and creates clean lines in the shower. Bases need a slight slope to drain water. Matching mosaics often help where edges are tight.
Trim choice frames the tile. Brushed brass warms black tiles, chrome gives a sharp contrast, and black trims blend in. Mitred corners look refined but demand precise cuts. Porcelain bullnose or metal trims provide reliable alternatives.
Detail checklist
-
Slope niche shelves toward the drain
-
Match trim depth to tile thickness
-
Use silicone at changes of plane, not grout
Design Ideas and Colour Pairings
Monochrome Black and White
A black and white scheme feels timeless and sharp. Black tiles on the floor anchor the space, while white walls keep it bright. A glossy black feature wall adds drama, but balance comes from white ceilings and mirrors that bounce light. This contrast creates impact without closing in the room.
Black with Wood Tones
Wood tones soften the strength of black tiles. Oak, walnut, or teak vanities sit well against matte black floors. The combination feels natural and spa-like, turning the bathroom into a retreat. Simple extras such as timber stools or shelving make the look feel warm and inviting.
Metallic Accents
Metal finishes lift the scheme in different ways. Brass brings warmth and pairs well with timber. Chrome feels crisp and modern, reflecting light and sharpening the contrast. Matte black fixtures blend in, letting the tile surface take centre stage. Each choice changes the atmosphere, even when the tiles remain the same.
Maintenance and Mistakes to Avoid
Streak-Free Cleaning Routines
Black tiles stay fresh with regular, light care rather than occasional heavy scrubs. Warm water and a mild cleaner keep porcelain clear. A soft cloth works well on glossy finishes, while a soft brush suits textured floors. Using a squeegee after showers prevents streaks before they start.
Shower Glass and Hard Water Spots
Mineral deposits are more visible against black. Preventing them saves effort later. A water softener or protective glass coating reduces marks. Keeping a small squeegee handy and running a ventilation fan after use also helps. If spots do appear, a gentle vinegar and water mix clears them without scratching.
Slope and Drainage in Wet Zones
Drainage is as important as surface choice. Floors without proper slope hold water, which increases slip risk and leaves marks. Wet zones should always fall evenly towards the drain. In steep areas, mosaics create neat edges and allow the slope to remain consistent. Avoid grouting changes of plane, as silicone handles movement more effectively.
Frequently Asked Questions
Are black tiles good for small bathrooms?
Yes. Large-format tiles with narrow joints make the space feel bigger, especially when paired with strong light and pale ceilings.
What finish is best for bathroom floors?
Matte or textured porcelain with an R10 rating or higher. These finishes balance safety and ease of care.
Which grout colour shows the least dirt with black tiles?
Black and dark grey both hide stains well and keep joints discreet.
Do black shower walls show water spots?
They can, but matte finishes reduce the effect. A quick wipe or squeegee after showers keeps walls clear.
How can slipping in the shower be prevented?
Tiles with an R11 or R12 slip rating work best. Mosaics also add grip and allow water to drain more effectively.