


Herringbone tiles have stood the test of time for good reason. Finding the best herringbone metro tiles for kitchen splashback projects is one of the most common decisions UK homeowners face when renovating a kitchen. The pattern adds architectural rhythm, depth, and a sense of craftsmanship that plain stacked layouts simply cannot replicate.
Whether planning a full kitchen floor refresh or a focused splashback behind the hob, herringbone kitchen tiles deliver a polished result across a wide range of materials, colours, and formats. This guide breaks down every decision needed to choose and lay them with confidence.
What Makes Herringbone Pattern Different from Other Tile Layouts?
The herringbone pattern is formed by placing rectangular tiles at 90-degree angles so the end of one tile meets the side of the next, creating a continuous broken zigzag. Unlike a standard brick bond or stacked layout, herringbone tiling in the kitchen introduces directional movement that draws the eye across the surface and makes even modest spaces feel more considered.
Chevron is often confused with herringbone but the two are distinct. Chevron tiles are cut at an angle to form a seamless V-shape, whereas herringbone tiles retain straight ends and meet at right angles. The result is a more textured, organic look that suits both traditional and contemporary kitchen tiles schemes equally well.
The broken joint in herringbone also distributes grout lines more evenly across the surface. This reduces the visual weight of the grout itself and makes the pattern, rather than the joints, the focal point of the wall or floor.
Which Tile Materials Work Best for Herringbone Kitchen Tiles?
Material choice directly affects durability, maintenance, and the final aesthetic. For kitchen walls and splashbacks, the most popular materials are ceramic, porcelain, and natural stone effect tiles, each with distinct advantages.
|
Material |
Best Use |
Finish Options |
Maintenance |
|
Ceramic |
Wall splashbacks |
Gloss, matt, crackle |
Easy, wipe clean |
|
Porcelain |
Floor and wall |
Gloss, satin, lappato |
Very low, stain resistant |
|
Marble effect |
Feature walls |
Polished, honed |
Seal periodically |
|
Stone effect |
Kitchen floor |
Matt, textured |
Low, non-slip options |
Ceramic kitchen tiles are lighter, easier to cut at 45-degree angles, and absorb adhesive well, making them a practical choice for DIY installations. Porcelain kitchen tiles offer superior density and water resistance, particularly important behind hobs and sinks where steam and grease are constant factors.
Best Tile Sizes for Herringbone Pattern in the Kitchen
Tile size dramatically shapes how the finished herringbone pattern reads in a kitchen. Smaller formats create tighter, more intricate zigzag lines that suit compact spaces and splashbacks, while larger formats produce bold, sweeping movement suited to open-plan kitchen floors.
Common size recommendations for herringbone kitchen tiles:
• 75 x 150mm or 100 x 200mm metro format: Classic splashback herringbone, detailed and elegant
• 100 x 300mm brick plank: Moderate zigzag rhythm, works on walls and narrow floor runs
• 200 x 400mm or 300 x 600mm: Bold floor herringbone, ideal for larger open kitchens
• Mosaic sheets in herringbone formation: Compact kitchens and feature niches
For most UK kitchens, the 75 x 150mm or 100 x 200mm metro format remains the most searched and most versatile. It works behind a cooker as a kitchen herringbone tile backsplash, across a full splashback wall, and even as a feature upstand against a contrasting worktop. Browse metro tiles to explore the full range of compatible formats.
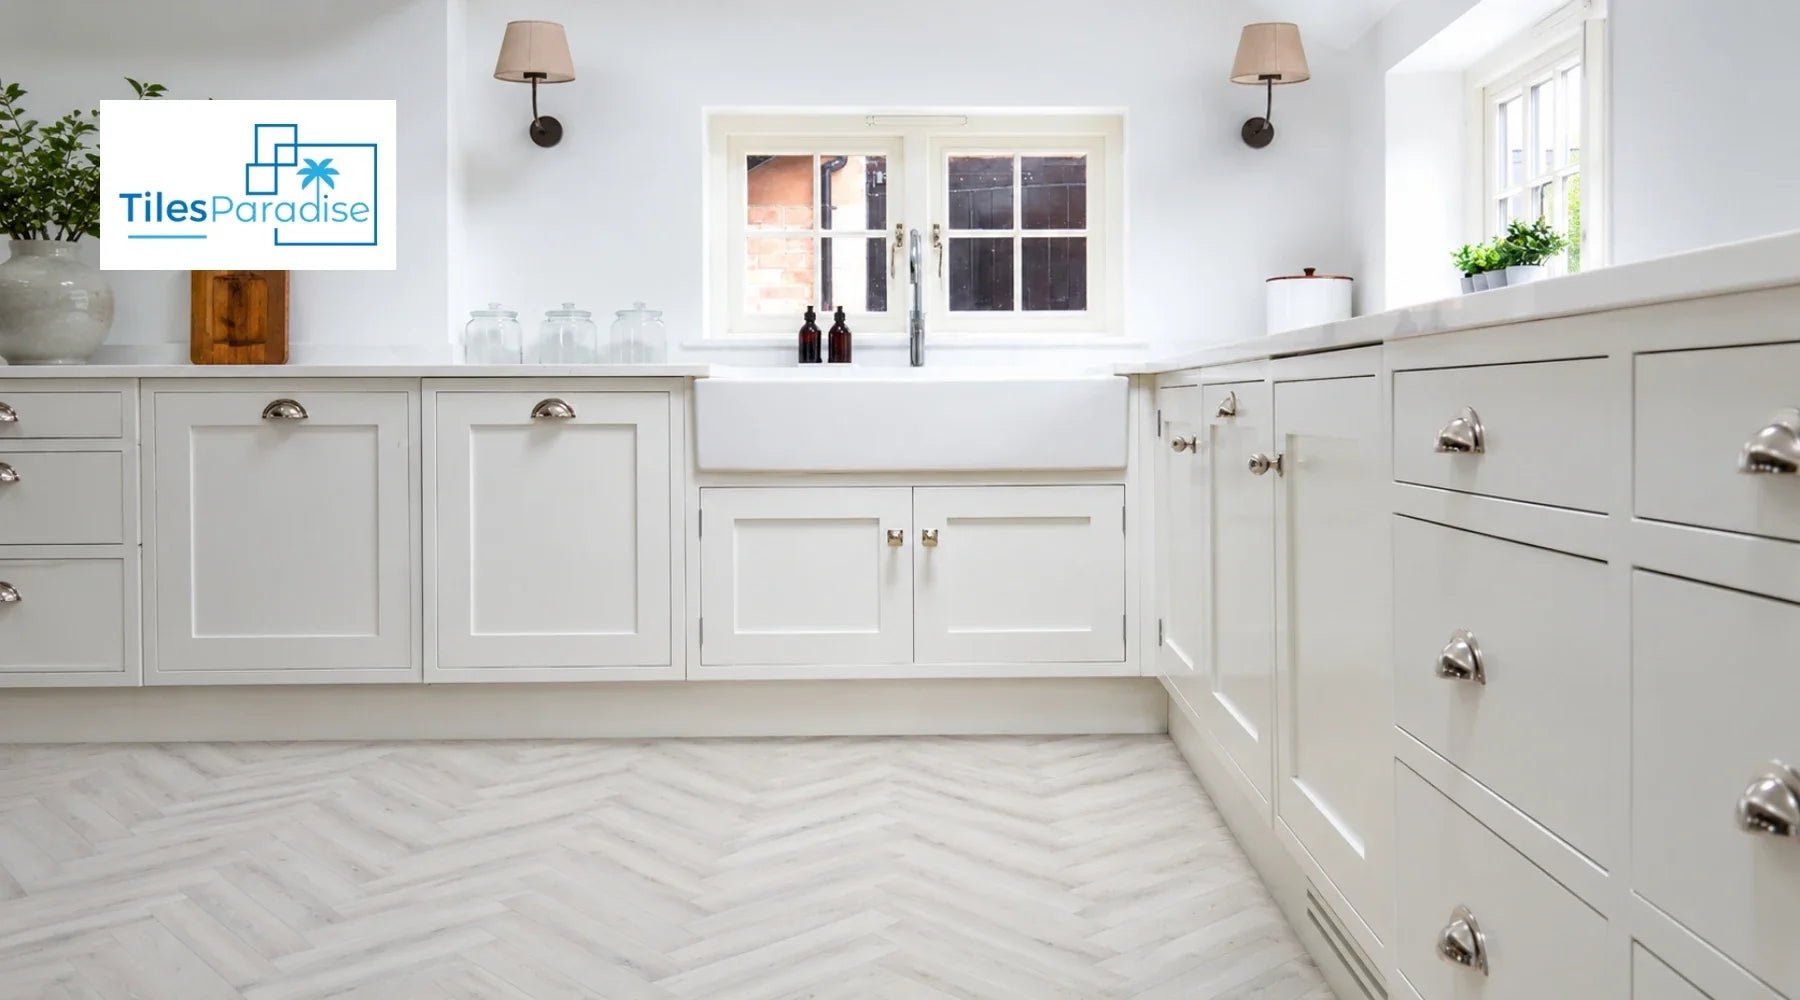
Herringbone Kitchen Floor Tiles: Layouts, Directions and Visual Effects
Herringbone floor tiles in the kitchen can be laid in two primary orientations: horizontal (parallel to the longest wall) and diagonal (at 45 degrees to the room). Horizontal herringbone kitchen floor tile layouts elongate narrower rooms such as galley kitchens, while diagonal herringbone opens up square rooms and adds a more dynamic energy.
Pointing the herringbone in the direction of travel through a space is a classic interior design technique. In open-plan kitchens leading into a dining area, the herringbone tile floor kitchen layout can be used to guide movement naturally from one zone to the next without the need for visual dividers. Browse kitchen floor tiles to compare floor-rated formats.
For larger floor areas, 60x120cm rectangular large tiles laid in herringbone create a contemporary statement, while 60x60cm square format tiles can be combined in plank-cut halves to achieve the same effect at lower cost.
Herringbone Kitchen Wall Tiles: Splashback Placement and Coverage
The most popular application for herringbone wall tiles in the kitchen is the splashback. This is the vertical surface running from worktop to the underside of wall units, typically between 400mm and 600mm high. A herringbone tiles kitchen splashback transforms a functional surface into a deliberate design statement without requiring expensive materials.
Full-height herringbone kitchen wall tiles behind an open shelving run or a range cooker create the strongest visual impact. Partial coverage above the hob only is a more restrained approach that suits kitchens where other surfaces are already busy. In either case, kitchen wall tiles in a gloss or satin finish amplify light and make the herringbone pattern more visible.
One often-missed detail: the top edge of a herringbone splashback can be finished with a straight horizontal cut for a clean line, or left with the natural stepped edge of the zigzag for a more handcrafted look. The grout colour is equally important here. A contrasting dark grout accentuates every line; a tone-matched grout softens the pattern into the wall.
White Gloss Porcelain Wall Tiles for Small Kitchen Splashbacks
In smaller kitchens, white gloss porcelain wall tiles laid in herringbone are one of the most effective ways to visually expand the space. The gloss surface reflects both natural and artificial light, bouncing it deeper into the room and reducing the sense of compression that matte finishes can produce in compact layouts.
A white herringbone kitchen tiles splashback in gloss porcelain also pairs with almost every cabinet colour. Against cream or off-white cabinetry it reads as seamless; against dark navy or forest green it becomes a crisp, high-contrast feature. White kitchen tiles in metro format remain one of the bestselling herringbone choices across the UK.
Best Porcelain Tiles for Kitchen Splashback Behind Gas Hob
Selecting porcelain tiles for a kitchen splashback behind a gas hob requires attention to heat resistance and surface integrity. Porcelain is a dense, low-porosity material fired at very high temperatures, making it inherently resistant to the radiant heat produced by gas burners. A fully vitrified porcelain tile laid in herringbone behind the hob will not crack, discolour, or absorb grease under normal cooking conditions.
The critical installation detail is that silicone sealant, not grout, should be used at the joint between the bottom tile course and the worktop. Grout is rigid and will crack under the slight thermal expansion and contraction cycles near a hob. A heat-rated neutral-cure silicone keeps that joint watertight and flexible, protecting both the tile and the worktop surface below.
Herringbone Tile Colours: Which Shades Work for Kitchen Schemes?
Colour selection for herringbone kitchen tiles should respond to the cabinet finish, worktop material, and the amount of natural light the kitchen receives. Below are the most popular colour families and the kitchen styles they suit best.
• White herringbone tiles kitchen: Universally versatile. Works with Shaker, handleless, and traditional kitchens. Reflects light in north-facing rooms. See white kitchen tiles
• Grey herringbone kitchen tiles: Neutral and contemporary. Particularly effective with quartz worktops and brushed steel hardware. Explore grey kitchen tiles
• Black herringbone tile kitchen: Bold and industrial. Works with concrete worktops and matte black fixtures. Browse black kitchen tiles
• Green herringbone tiles kitchen: On-trend with a botanical warmth. Pairs naturally with brass taps and oak shelving. View green kitchen tiles
• Blue herringbone tiles kitchen: Classic and coastal. Works well in traditional or Farrow & Ball inspired kitchens. Shop blue kitchen tiles
• Beige and cream herringbone tiles: Warm and inviting. Suits country and farmhouse kitchen styles. See beige kitchen tiles and cream kitchen tiles
• Gold herringbone kitchen tiles: Luxurious with a warm metallic accent. Particularly effective as a narrow feature column beside a range cooker. Browse gold kitchen tiles
Herringbone Marble and Stone Effect Kitchen Tiles for a Premium Finish
Herringbone marble tiles in the kitchen are one of the most effective ways to introduce luxury without the maintenance burden of natural stone. Porcelain tiles with marble effect printing now replicate the veining, depth, and colour variation of Calacatta, Statuario, and Carrara marble at a fraction of the cost and with near-zero porosity.
Explore marble effect kitchen tiles in herringbone layouts for a splashback that reads as high-end stone but cleans effortlessly with a damp cloth. For an even more dramatic result, onyx kitchen tiles with their deep, translucent layering create a truly show-stopping herringbone feature wall behind an island hob or open shelving unit.
Herringbone pattern kitchen tiles in a marble or onyx format work particularly well when paired with plain, matte-finish cabinetry. The pattern and material provide all the visual interest needed, so surrounding surfaces can remain calm and understated.
How to Lay Herringbone Tiles in a Kitchen: Key Installation Steps
Herringbone tiling requires more preparation than a straight lay because every cut tile at the perimeter must be angled. Expect 15 to 20 percent more tile waste compared to a brick bond layout, and budget for the additional adhesive needed to cover irregular cut edges securely.
Installation steps for kitchen herringbone tile backsplash or floor:
1. Find and mark the centre point of the wall or floor before placing any tiles
2. Dry lay the first run from the centre outward to check the pattern and edge cuts before using adhesive
3. Use a notched trowel to apply flexible tile adhesive, working in sections no larger than 60 x 60cm to prevent skinning
4. Place tiles at 90-degree alternating angles, checking alignment every three or four tiles with a spirit level
5. Allow full cure time before grouting, typically 24 hours for walls and 48 hours for floors
6. Apply grout with a rubber float, working diagonally across the tile faces to fill all joints evenly
7. Seal the grout line at the worktop-tile junction with a flexible silicone rated for kitchen use
For patterned or larger format tiles, using patterned kitchen tiles with pre-printed herringbone sheets speeds installation significantly on splashback areas and reduces cut complexity.
Grout Colour and Joint Width for Herringbone Kitchen Tiles
Grout joint width for herringbone metro tiles is typically 2 to 3mm. This width is narrow enough to keep the focus on the tile face and the zigzag pattern rather than the joints, but wide enough to allow for slight sizing variations between tiles, particularly in handmade or artisan-finish ranges.
Grout colour has an outsized effect on the final result. White or cream grout with white herringbone kitchen tiles creates a seamless, clean look where the pattern is visible only through shadow and light play. Dark grey or charcoal grout with the same white tile creates a graphic, high-contrast grid that makes the herringbone pattern a dominant feature rather than a subtle backdrop.
For grey herringbone kitchen wall tiles, a mid-grey joint-matched grout is the most forgiving choice. It conceals discolouration over time better than white grout and maintains a cohesive look as the kitchen ages. Always use a flexible, waterproof grout rated for kitchen environments, particularly near the sink and hob.
Herringbone Kitchen Tiles Cost Guide: What to Budget in the UK
The cost of herringbone kitchen tiles in the UK varies widely depending on material, format, and supplier. As a general guide, ceramic metro tiles in herringbone start from around £15 to £25 per square metre, mid-range porcelain from £30 to £60 per square metre, and premium marble effect or large-format porcelain from £60 to £120 per square metre.
Additional costs to include in any budget:
• 15 to 20 percent extra tiles for herringbone waste allowance at edges and cuts
• Flexible tile adhesive rated for kitchen use: approximately £10 to £18 per 20kg bag
• Waterproof grout in the chosen colour: approximately £8 to £15 per bag
• Kitchen-rated silicone for hob junction: approximately £5 to £10 per cartridge
• Professional tiler day rate for herringbone in the UK: typically £200 to £350 per day depending on region and complexity
A standard kitchen splashback of approximately 2 to 3 square metres can typically be tiled in half a day by an experienced tiler, making herringbone far more accessible in terms of labour cost than many homeowners expect.
Final Insights
Herringbone kitchen tiles remain one of the most enduring and versatile layout choices available to UK homeowners. The pattern works across materials from basic ceramic to premium marble effect porcelain, across colours from crisp white to deep onyx, and across applications from compact splashbacks to large open-plan kitchen floors. The key is matching tile size to the scale of the surface and grout colour to the desired level of pattern definition.
For a splashback project, starting with a classic white or grey herringbone metro tile in gloss porcelain is the most proven approach. For a floor, scaling up to a plank format in a neutral stone effect delivers sophistication without visual noise. Every decision flows from the cabinet colour, the worktop material, and the light conditions in the kitchen. Get those three foundations right and herringbone tile kitchen layouts will elevate the space for years without ever feeling dated.