


Choosing the right kitchen splashback tiles is more than a styling decision. The wall behind a gas hob faces daily heat, grease, and steam, and the tile material has to cope with all three without cracking or discolouring. Homeowners searching for the best porcelain tiles for kitchen splashback behind gas hob often discover that performance comes down to material density, finish type, and correct installation, not just visual appeal.
Porcelain stands out as the most dependable choice across UK kitchens because it is non-porous, fired at higher temperatures than ceramic, and rated to handle the thermal demands of a working hob zone. This guide covers everything from heat safety distances to layout ideas, grout selection, and size guidance, so the decision is straightforward from the start.
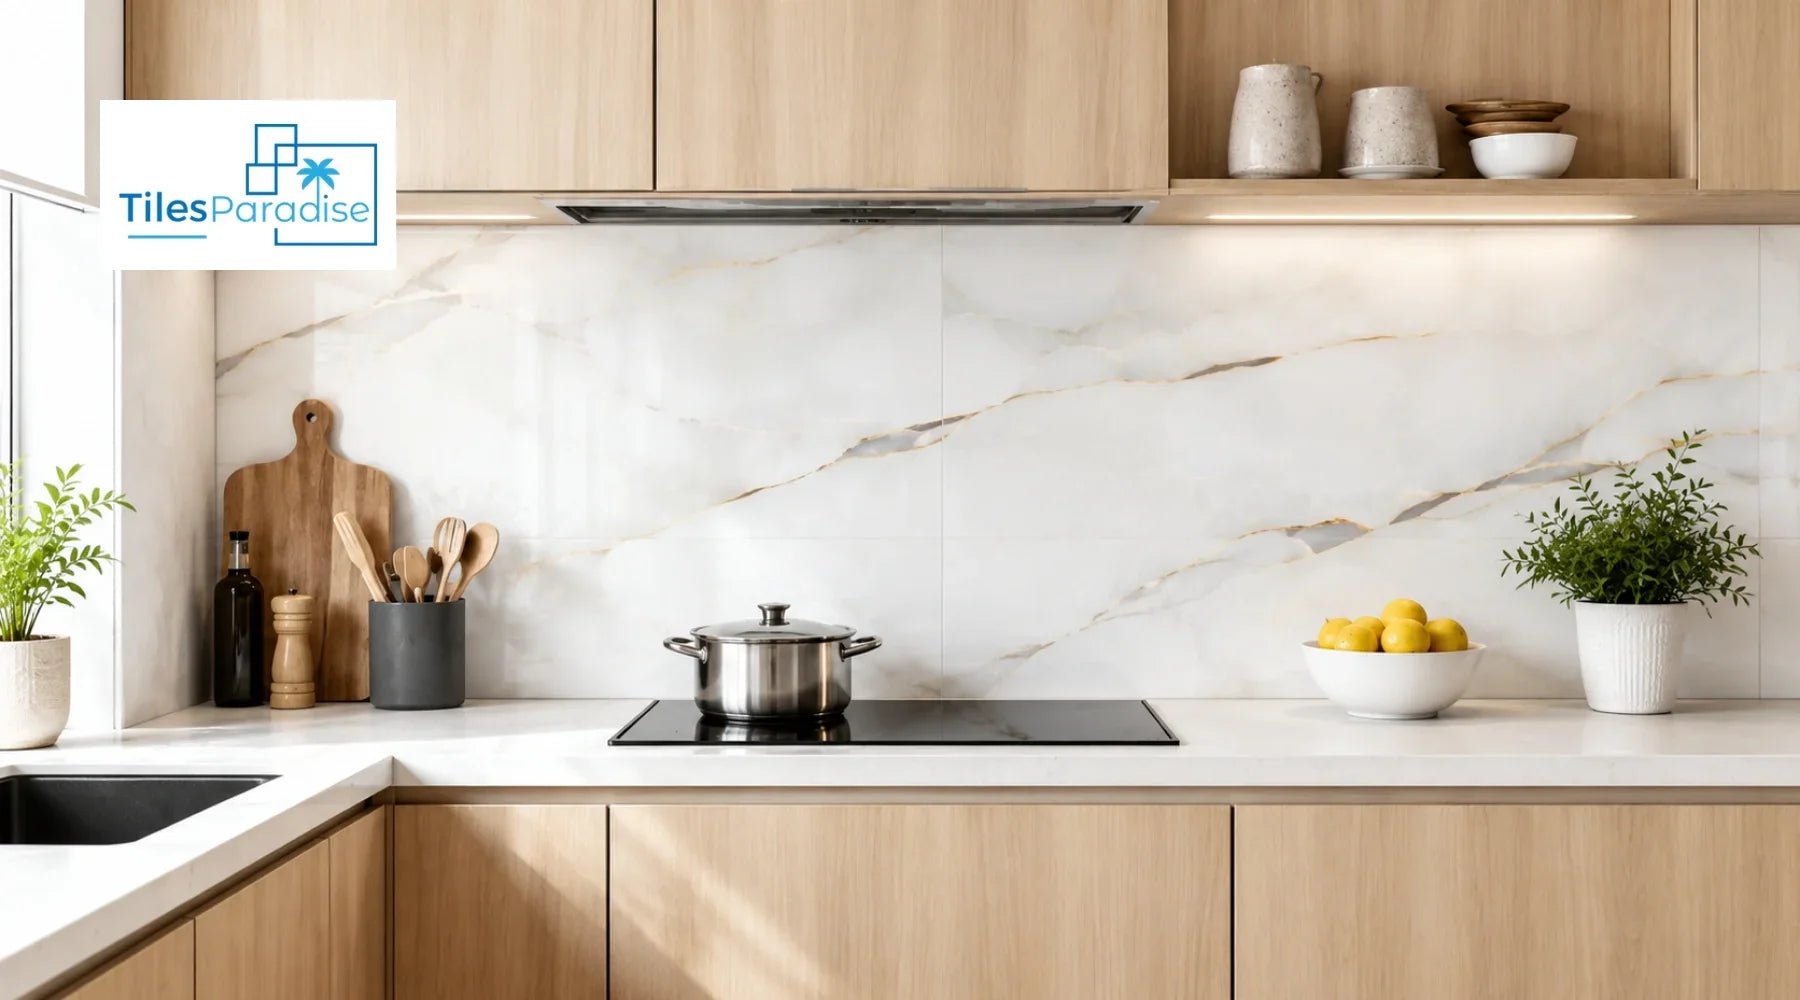
Why Porcelain Outperforms Other Splashback Materials Behind a Gas Hob
Porcelain tiles absorb less than 0.5% moisture due to their dense, vitrified body, which means grease and steam cannot penetrate the surface and cause internal damage over time. Fired at temperatures above 1,200°C, porcelain maintains structural integrity even when exposed to repeated heat cycles from gas burners. Ceramic, stone-effect laminates, and acrylic panels cannot match this thermal stability, making porcelain the preferred material for the hob zone in UK kitchens.
Browse the full range of porcelain kitchen tiles to find options suited to both the cooking zone and surrounding wall areas.
What Heat Rating Does a Kitchen Splashback Tile Need Behind a Gas Burner?
UK building regulations and hob manufacturer guidelines recommend a minimum clearance of 150mm between an open gas flame and any wall surface. Within that zone, tiles must be thermally stable, and the adhesive and grout used behind them should carry a heat-resistant rating, typically up to 120°C or higher. Porcelain and glazed ceramic tiles satisfy this requirement, while materials such as acrylic, standard laminate, and untreated timber do not.
Standard tile adhesive is not sufficient behind a gas hob. Heat-resistant adhesive, often labelled as D2TE or S2 class, should be used in the hob zone to prevent de-bonding caused by thermal expansion. Epoxy-based grout is also recommended for this area as it resists staining from cooking oils and does not absorb moisture that could weaken joints over time.
|
Material |
Heat Safe Behind Gas Hob? |
Min. Clearance Required |
|
Porcelain tiles |
Yes |
150mm from flame |
|
Glazed ceramic tiles |
Yes |
150mm from flame |
|
Toughened glass |
Yes |
75–150mm from flame |
|
Natural stone (granite) |
Yes |
150mm from flame |
|
Acrylic panels |
No |
Not suitable |
|
Standard laminate |
No |
Not suitable |
Which Porcelain Tile Finish Works Best for a Kitchen Splashback?
Matt and satin finishes are generally more practical behind a hob because they do not show fingerprints or steam marks the way high-gloss surfaces do. However, gloss and polished finishes remain popular choices for kitchen splashbacks because they reflect light and make smaller kitchens feel more open. The key trade-off is that gloss tiles require more frequent cleaning to maintain their appearance in a high-cooking household.
Soft-sheen and lappato finishes sit between matt and full gloss, offering a subtle reflective quality without the high-maintenance demands of a polished surface. For splashback tiles kitchen-wide rather than just behind the hob, a consistent finish across all wall areas creates a more unified look. Explore the range of kitchen wall tiles to compare finish options across the full collection.
Best Tile Sizes for Kitchen Splashbacks: From Metro to Large Format
Tile size directly affects both the visual weight of a splashback and the amount of grout in the finished installation. Smaller tiles such as 75x150mm metro tiles create more grout lines, which require more maintenance in a high-splatter zone. Large-format tiles reduce joint frequency and make the wall easier to wipe clean after cooking.
The table below gives a practical size guide for common splashback layouts in UK kitchens:
|
Tile Size |
Best For |
Grout Lines per m² (approx) |
|
75 x 150mm metro |
Traditional, compact kitchens |
High (80–120+) |
|
200 x 400mm |
Mid-size kitchens, feature walls |
Medium (30–50) |
|
300 x 600mm |
Modern kitchens, easy cleaning |
Low (15–25) |
|
600 x 600mm square |
Minimalist, large kitchens |
Very low (8–12) |
|
600 x 1200mm large |
Statement walls, fewer joins |
Minimal (4–8) |
For a contemporary result with minimal maintenance, the 60x60cm square format tiles and 60x120cm rectangular large tiles offer significant grout line reduction compared to smaller formats.
Popular Kitchen Splashback Tile Layout Patterns and Tiling Ideas
The way tiles are laid changes the visual impact of the splashback entirely, even when the same tile format is used throughout. Brick bond and offset layouts add movement to a plain wall, while herringbone arrangements create a more dynamic focal point, particularly behind a hob or range cooker. Stacked vertical or horizontal layouts read as more formal and are well-suited to handleless modern kitchens.
Some of the most effective kitchen splashback tile ideas in current UK kitchen design include:
• Herringbone tiles kitchen splashback using 75x150mm porcelain metro tiles for a classic but dynamic finish
• Large-format book-matched slabs in marble effect for a seamless luxury look behind the hob
• Feature tile panel in a contrasting colour or pattern behind the cooking zone with plain tiles running to either side
• Full-height tiling from worktop to ceiling in a single colour to add height and visual continuity
• Patterned insert strip mid-wall using encaustic or geometric tiles for a kitchen splashback tiling ideas approach that adds personality without overwhelming the space
Modern kitchen splashback tiles in herringbone and stacked bond work particularly well in both metro tile layouts and larger format rectangular formats.
Colour Guide: Choosing Kitchen Splashback Tiles That Work with Any Kitchen
Splashback colour choices often come down to whether the wall should blend into the cabinetry or act as a distinct feature. White and cream tiles remain the most widely used option in UK kitchens because they reflect light and work across cabinet colours from dark navy to pale oak. Grey, sage green, and black are becoming increasingly popular for kitchens with a more contemporary or muted palette.
Colour considerations by cabinet tone:
• White or cream cabinets: grey, blue, green, or patterned splashback tiles create clear contrast
• Dark cabinets (navy, charcoal): white, cream, or marble-effect tiles brighten the space
• Wood-effect cabinets: green, beige, or terracotta tones complement the warmth
• Handleless modern kitchens: large-format grey or black tiles maintain clean, minimal lines
Explore colour collections including white kitchen tiles, grey kitchen tiles, green kitchen tiles, blue kitchen tiles, black kitchen tiles, beige kitchen tiles, and gold kitchen tiles for the full range.
Kitchen Splashback Tile Ideas for Specific Kitchen Types
Best Kitchen Wall Tiles for Small Kitchens
In a small kitchen, the splashback has a greater influence on the perceived size of the room than in a larger space. Light-coloured tiles with a gloss or satin finish reflect more light and push the walls back visually, while large-format options with minimal grout lines avoid the chopped-up effect that comes from many small tiles laid closely together. Keeping the splashback colour within two tones of the cabinetry prevents visual clutter.
Vertical stacking or running bond layouts also add height to a low-ceilinged kitchen. For a full breakdown of tile choices and layout advice specific to compact spaces, the guide on kitchen wall tiles for small kitchens covers format, finish, and colour strategies in detail.
White Gloss Porcelain Wall Tiles for Small Kitchen Splashbacks
White gloss porcelain remains the single most effective tile choice for a small kitchen splashback because gloss surfaces amplify natural and artificial light, making a compact room feel considerably brighter and more open. Porcelain in a white gloss finish also offers the practical advantage of being easy to spot-clean, as grease marks and steam residue show up clearly and wipe away without effort.
The non-porous glaze on a white porcelain tile prevents long-term staining behind the hob, which is a particular concern in smaller kitchens where the cooking zone often sits closer to the surrounding walls and cabinets. A detailed style and specification guide for this approach is available at white gloss porcelain wall tiles for small kitchen splashbacks.
Grout Selection for Kitchen Splashbacks: Colour, Type, and Maintenance
Grout choice has a larger long-term impact on a kitchen splashback than most homeowners expect. Pale grout behind a gas hob discolours within months of daily cooking, regardless of how well it is sealed. Dark grey or charcoal grout in the same tone as the tile surface masks grease staining far more effectively and maintains a consistent appearance over time.
Epoxy grout is the most durable option for the hob zone specifically because it is non-porous, chemical-resistant, and impervious to cooking oils. It costs more than cement-based grout but does not require annual resealing, making it the more economical long-term choice. For splashbacks away from the hob, standard flexible grout is adequate provided it is sealed on installation and re-sealed every one to two years.
Tile Effect Splashback Panels vs Real Tiles: What UK Homeowners Need to Know
Tile effect splashback panels for kitchens offer a seamless, grout-free alternative to traditional tiling and are widely used in rental properties and budget refurbishments. PVC and laminate panels with tile effect kitchen splashback prints have improved significantly in realism, but they carry a fundamental limitation: they cannot be used directly behind a gas hob. Heat from open burners softens or warps plastic-based panels, and no tile effect kitchen splashback product replaces the thermal performance of a genuine porcelain or ceramic tile in this zone.
For gas hob installations, real tiles remain the only safe and durable option in the immediate hob zone. Tile effect panels can be used on the surrounding walls where heat is not a direct factor, but the area behind active burners should always be tiled with a heat-rated material and heat-resistant adhesive. Explore options including patterned kitchen tiles and marble-effect kitchen tiles that replicate premium looks using the thermal integrity of porcelain.
How to Tile a Kitchen Splashback: Key Steps for a Professional Finish
Tiling a kitchen splashback is a manageable DIY task in most UK homes, provided the wall surface is prepared correctly and the right materials are selected for the hob zone. The most common installation failures result not from tile quality but from incorrect adhesive choice, poorly levelled surfaces, or insufficient grout joint width.
Core installation steps for tiling a kitchen splashback:
1. Turn off power to any sockets in the splashback area before starting
2. Mark a level horizontal datum line across the wall using a spirit level
3. Apply heat-resistant tile adhesive (D2TE class) behind the hob zone; standard flexible adhesive elsewhere
4. Set tiles from the centre of the wall outward to ensure balanced cuts at each end
5. Use tile spacers consistently, 2mm for large-format tiles, 1.5mm for metro formats
6. Allow adhesive to cure fully (minimum 24 hours) before applying grout
7. Apply epoxy grout behind the hob; standard flexible grout on surrounding wall areas
8. Seal grout on non-epoxy sections once cured; re-seal annually in high-use zones
For a full selection of tiles suited to both DIY and professional installation, the kitchen tiles collection covers every format, finish, and colour in stock.
Final Insights
Porcelain is the most reliable material for kitchen splashback tiles in any UK home with a gas hob. It combines genuine heat resistance, near-zero porosity, and a surface that requires no sealing, making it significantly lower maintenance than natural stone, ceramic, or any panel-based alternative in the hob zone. Selecting the right format, finish, and grout type during the planning stage prevents the costly remedial work that often follows rushed tile choices.
Splashback tiles kitchen-wide do not all need to perform the same function, so a practical approach is to use heat-rated porcelain directly behind the hob and then extend the design with coordinating tiles, cream kitchen tiles, onyx effect tiles, or kitchen floor tiles that tie the whole space together without compromising safety at the most heat-intensive wall in the room.