


Regrouting tiles is one of the most effective ways to breathe new life into a tired kitchen or bathroom without the cost of a full renovation. Over time, grout lines can become cracked, discoloured, or porous, leading to structural issues and a diminished aesthetic. By refreshing these joints, you not only restore the beauty of your ceramic or porcelain surfaces but also reinforce the waterproof barrier that protects your home from moisture damage.
Whether you are dealing with mould growth or crumbling joints, selecting the right sanded or unsanded grout and mastering the application technique is essential. Using a rubber grout float to firmly pack the joints and following a precise cleaning schedule ensures a professional, long-lasting finish. This guide walks you through the step-by-step process to achieve a durable result that makes your tiled surfaces look brand new again.
Why is It Necessary to Regrouting Tiles?
Regrouting is a vital maintenance task that protects the structural integrity and lifespan of your tiling. By replacing old grout with fresh material, you restore a watertight seal and extend the life of your tile installation.

Core Benefits of Regrouting
-
Prevents Moisture Damage: The primary purpose of grout is waterproofing. When it fails, moisture seeps behind tiles, which can cause wood rot or weaken the tile adhesive, leading to expensive structural damage.
-
Improves Hygiene: The truth of the matter is that porous grout traps debris and mould. Regrouting removes these hazards, providing a clean surface that is easier to maintain with a standard cleaner, significantly boosting home hygiene.
-
Maintains Tile Stability: Grout keeps tiles from shifting in their zones or grinding against each other. Ensuring the length of the grout line is solid prevents pieces from becoming loose or chipping.
-
Saves Money: Knowing how and when to regrout avoids the cost of a full replacement. It is a high-impact, low-cost way to refresh your tile surfaces and increase property value.
What are the Tools & Materials Needed Before Regrouting Tiles?
To get your tiling looking brand new, gather these essentials before you start scraping:
-
Removal Tools: A grout rake or a Vitrex electric grout remover to excavate old, crumbling joints.
-
Joint Prep: A vacuum and stiff brush to ensure the gaps are completely debris-free.
-
Mixing Gear: A bucket and stirrer to reach a smooth, peanut butter consistency.
-
Application: A rubber grout float to firmly pack the new grout into spaces.
-
The Finishers: A large tiling sponge for cleaning and a microfibre cloth to buff away the haze.
-
Protection: Grout sealer to prevent future mould and stains.
-
Safety PPE: Safety goggles, heavy-duty gloves, and a dust mask.
How to Regrout Tiles: Step-by-Step
Revitalising your bathroom tiles or kitchen splashback requires a methodical approach to ensure the new grout bonds effectively and provides long-lasting durability. Follow these stages to complete your regrouting project.
Step 1: Protect the Work Area
Before starting, protect your fixtures and surroundings. Use dust sheets to cover the floor and worktop. Use masking tape to seal off taps or drains to prevent debris and grout powder from clogging the pipes.
Step 2: Remove the Old Grout
You must remove the bulk of the old material to create a sufficient depth (at least 2-3mm) for the new layer. Use a grout rake, grout saw with a carbide tip, or an electric multi-tool like a Dremel with a grout removal bit. Wear eye protection, a dust mask, and gloves as this stage creates significant dust. Work in one direction to avoid damaging the tile edges.
Step 3: Clean the Joints
Clear the gaps of all loose particles and lumps. Use a vacuum cleaner followed by a hand brush to ensure the joints are completely free of dirt and grime. For the best bonding, wipe the grout lines with a damp grout sponge to remove any lingering residue.
Step 4: Mix the Grout Mixture
Combine the grout powder and water in a bucket according to the manufacturer's specified ratio. Mix until you achieve a smooth mixture with a putty-like consistency. If working in wet areas like a shower, consider using a grout with polymer additives or a high-performance brand like Mapei or BAL for better resistance to mould and mildew.
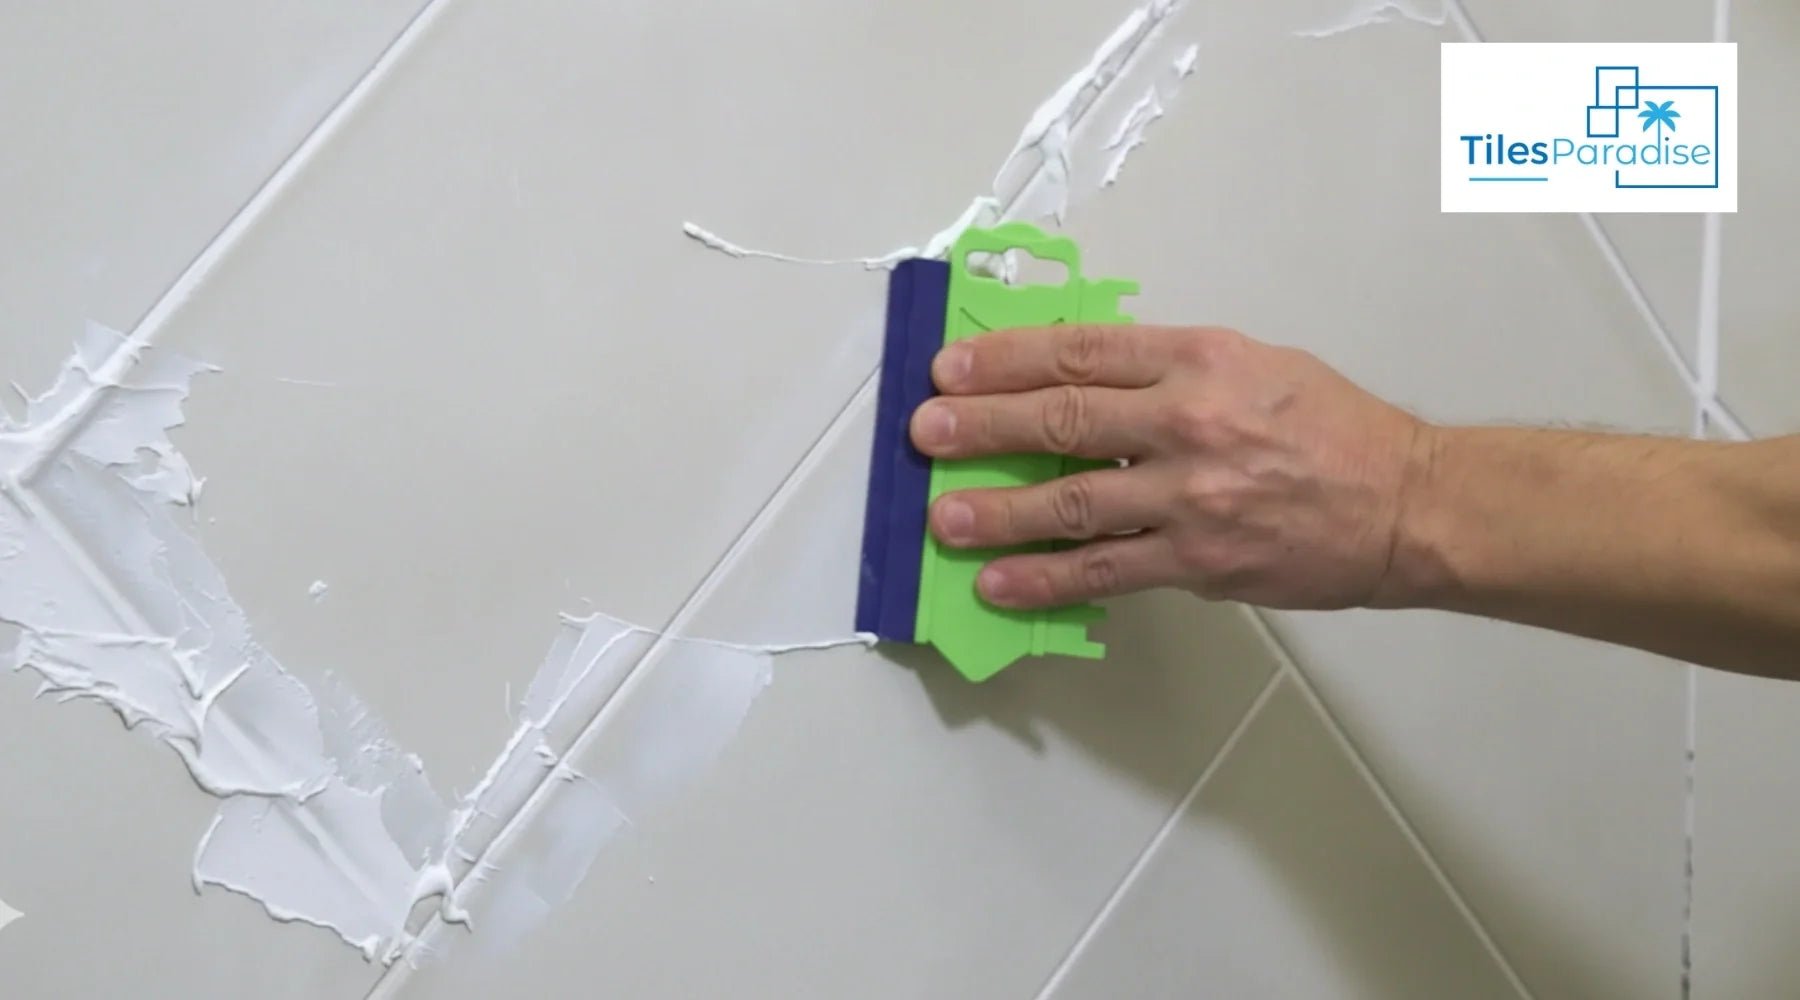
Step 5: Application of New Grout
Load a grout float or grout spreader with the mixture. Apply the grout using a diagonal motion across the tiles, pressing firmly to ensure the joints are fully packed. Avoid leaving large gaps or air pockets, as these lead to grout cracking and water ingress.
Step 6: Wipe and Smooth the Joints
Wait about 10–20 minutes (refer to the packaging for exact timings) for the grout to set slightly. Use a damp grout sponge to wipe away the excess grout from the tile surface. To achieve a professional finish, run a grout finisher or a rounded tool along the joint to create a consistent profile.
Step 7: Haze Removal and Buffing
Once a grout haze (a thin film) appears on the tiles, use a dry microfibre cloth to perform buffing. This removes the last of the residue and polishes the tile finishes. Avoid using harsh cleaning products or bleach during the initial curing period, as this can affect the grout pigment and structural integrity.
How Much Grout Do I Need for Regrouting Tiles?
To determine how much grout you need for regrouting, calculate the total area in square meters and expect to use approximately 0.2–0.5 kg of grout per square meter.

-
Coverage: 5 kg of grout covers roughly 10–15 m².
-
Tile Size & Spacers: Smaller tiles and wider joints (e.g., 4 mm vs 2 mm) significantly increase grout consumption.
-
Depth: Grout should be removed to a depth of at least 3 mm to 6 mm for new application.
-
Waste Factor: Always add 10% (or up to 20% for smaller, more complex areas) to your estimate.
How Many Ways are There to Remove Old Grout?
To remove old grout efficiently, focus on these essential components:
Manual Extraction
For smaller areas, use a grout rake or a removal saw blade. Apply steady pressure along the grout line to scrape out the material. Be careful not to slip, as this can cause edge damage to the surrounding tiles.
Power Extraction
For large joints, a power tool like the Fein Multimaster is the fastest option. Use a tungsten carbide grout blade to cut through the hardened joint. These blades vibrate to pulverise the grout into dust and debris without cracking the surface.
How Long Does It Take Grout to Dry
Grout typically takes 24 to 72 hours to fully dry and cure, depending on the type used, temperature, and humidity. Standard cementitious grout usually requires 72 hours for a full cure, while epoxy grout sets in about 24 hours. It is essential to wait at least 24 hours before walking on tiles or exposing them to water.
-
Cement-based Grout: 48–72 hours to cure. Best to wait 72 hours before sealing or heavy use.
-
Epoxy Grout: 24 hours to cure, and it does not require sealing.
-
Humidity & Temp: High humidity or cold temperatures can significantly increase drying time.
-
Light Traffic: You may be able to walk on floor tiles gently after 24 hours, but avoid heavy furniture.
-
Haze Removal: You can remove haze from tiles using a dry cloth after the first 24 hours.
What are common regrouting mistakes?
To avoid a failed regrouting project, steer clear of these common errors:
1. Poor Preparation
-
Shallow Removal: Removing less than 2mm of old grout prevents a proper bond, causing the new material to flake off.
-
Dirty Joints: Leaving dust or debris in the grout lines weakens adhesion.
-
Tile Damage: Using excessive pressure with a power tool, leading to chipped edges.
2. Application Mistakes
-
Wrong Consistency: Adding too much water leads to cracks; too little makes the joint brittle.
-
Skipping the Slake: Not letting the mix sit for 10 minutes prevents the Chemicals from Activating.
-
Directional Errors: Dragging the tool parallel to the seam instead of diagonally, which pulls the grout back out.
3. Cleanup & Protection
-
Over-Washing: Using a dripping sponge washes out the pigment and weakens the structure.
-
Haze Neglect: Failing to buff away Grout Haze before it hardens on the surface.
-
No Sealer: Leaving the joints unsealed in a power shower, leading to rapid mould growth.
Final Verdict:
Regrouting tiles centres on patience. Successfully removing old material and applying a fresh seam extends the life of your tiles. Ensuring the grout joint is clean and the mix consistency is correct prevents future failure.
A professional finish depends on avoiding slips that cause edge damage. Taking these precautions during work ensures your bathroom remains watertight. Always buff away Grout Haze from the surface before it sets.
Whether refreshing a power shower or backsplash, the effort is worth the result. Properly grouting tiles transforms a tired area into a rejuvenated space. Using a grout sealer protects against moisture for a durable joint.
Common FAQ's
-
Is it worth regrouting tiles?
Regrouting is generally very worth it if your tiles are still in good condition, but the grout is mouldy, cracked, or discoloured. It is a highly cost-effective way to refresh a bathroom or kitchen, costing significantly less than a full retile while preventing water damage behind the walls.
-
Can you regrout tile yourself?
Yes, you can absolutely regrout tile yourself. It is a straightforward, budget-friendly DIY project that can make old kitchen or bathroom surfaces look brand new.
-
Can you install new grout over old grout?
You can technically grout over existing grout, but it is generally not recommended as the new layer may not adhere properly, leading to cracking and flaking within a few weeks. For a durable finish, remove at least 2-3mm (or half the depth) of the old grout using a grout saw or oscillating tool.
-
What are the signs you need to regrout?
You need to regrout tiles when you notice visible cracks, crumbling, or missing grout, as well as persistent mould, mildew, or deep stains that cleaning cannot remove. Other key indicators include loose or wobbly tiles, water leaks, and powdery residue, suggesting the sealant has failed.
-
Why Do You Need to Take Out Old Grout Before Regrouting?
Removing old grout is essential because new grout cannot properly adhere to old, porous, or damaged material, leading to cracking, crumbling, and a weak, thin finish. Eliminating the old layer ensures a deeper, stronger bond, prevents water leakage, and provides a fresh, clean surface for a durable, aesthetically pleasing result.