


If you’re planning a bathroom or kitchen redesign, the prospect of dusty demolition and the hassle of tile removal can be daunting. Homeowners often find themselves asking: Can you tile over tile? The answer is a resounding yes, provided the existing surface is sound. This method serves as a clever shortcut, offering a faster makeover and a fresh style without the usual disruption of starting from scratch.
Skipping the demolition requires a strategic approach to avoid a recipe for disaster. Critical factors such as bond strength, moisture signs, and the weight limit of your substrate (especially plasterboard) must be assessed first. Additionally, you must account for height build-up because an extra tile layer can interfere with doors, thresholds, and shower trays.
This guide covers advantages, disadvantages, a step-by-step guide, costs, adhesive selection, and professional tiling tips. We explore everything you need to ensure a professional finish and help you decide whether this option is the right way to transform your home.
Can You Tile Over Tile Without Removing It?
"Can I tile over existing ceramic tile? This is done regularly where there is not a floor height or wall thickness limitation and where the existing tile is well-bonded." - Tile Council of North America (TCNA).
Absolutely. While tile-on-tile is often viewed as a shortcut, it is a professional-grade solution when the substrate performance is flawless. The answer lies in the condition of the originals; if the base is typically concrete or cement board and is solid, you can apply a new layer without movement or adhesion failure.
However, you must account for the increased thickness, as the added weight and load can affect fixtures, fittings, and wall finish transitions in kitchens and showers. Proper preparation is essential to ensuring moisture integrity and a level finish.
What are the Pros and Cons of Tiling Over Tile?
Pros
-
Eco-Friendly: Prevents the disposal of approximately 20–25 kg/m² of ceramic waste in landfills.
-
Disruption Control: Significantly reduces noise and makes rooms usable sooner.
-
Convenience: Ideal for short-term upgrades or rental properties where full demolition is impractical.
Cons
-
Structural Limits: Can exceed weight limits for plasterboard walls (typically max 20–32 kg/m² total).
-
Adhesion Challenges: Non-porous or glossy old tiles require aggressive sanding or specialist bond-promoting primers.
-
Corrective Limits: You cannot easily fix severe unevenness (greater than ±3 mm over 2 m) without removal.
When to Tile Over Tiles and When Not?
Choosing to tile over an existing surface is a common shortcut in renovations. Success depends entirely on the mechanical bond of the original layer and the structural capacity of the substrate.
Comparison: Tiling Over vs. Full Removal
|
Feature |
Tiling Over Existing Tile |
Full Removal & Re-tiling |
|
Preparation Time |
Fast: Saves 30–50% of labour time by skipping demolition. |
Slow: Requires extensive demolition and substrate repair. |
|
Project Cost |
Lower: Reduces labour, disposal, and skip hire fees. |
Higher: Significant costs for removal, waste disposal, and levelling. |
|
Height Impact |
Increases: Adds 10–15 mm of height; may foul doors or appliances. |
Neutral: Maintains the original floor/wall level. |
|
Weight Load |
High: Adds 18–22 kg/m² of dead load to the structure. |
Standard: No additional weight stress on the substrate. |
|
Surface Mess |
Minimal: No dust or debris from ripping out old materials. |
Major: Significant dust, noise, and ceramic waste generation. |
|
Risk Factor |
Higher: New tiles are only as strong as the old bond; hides damp. |
Lower: Direct bond to the original subfloor or wall substrate. |
|
Substrate Safety |
Protective: Prevents damage to membranes or pipework during removal. |
Exposed: Risk of damaging subfloors or waterproofing layers. |
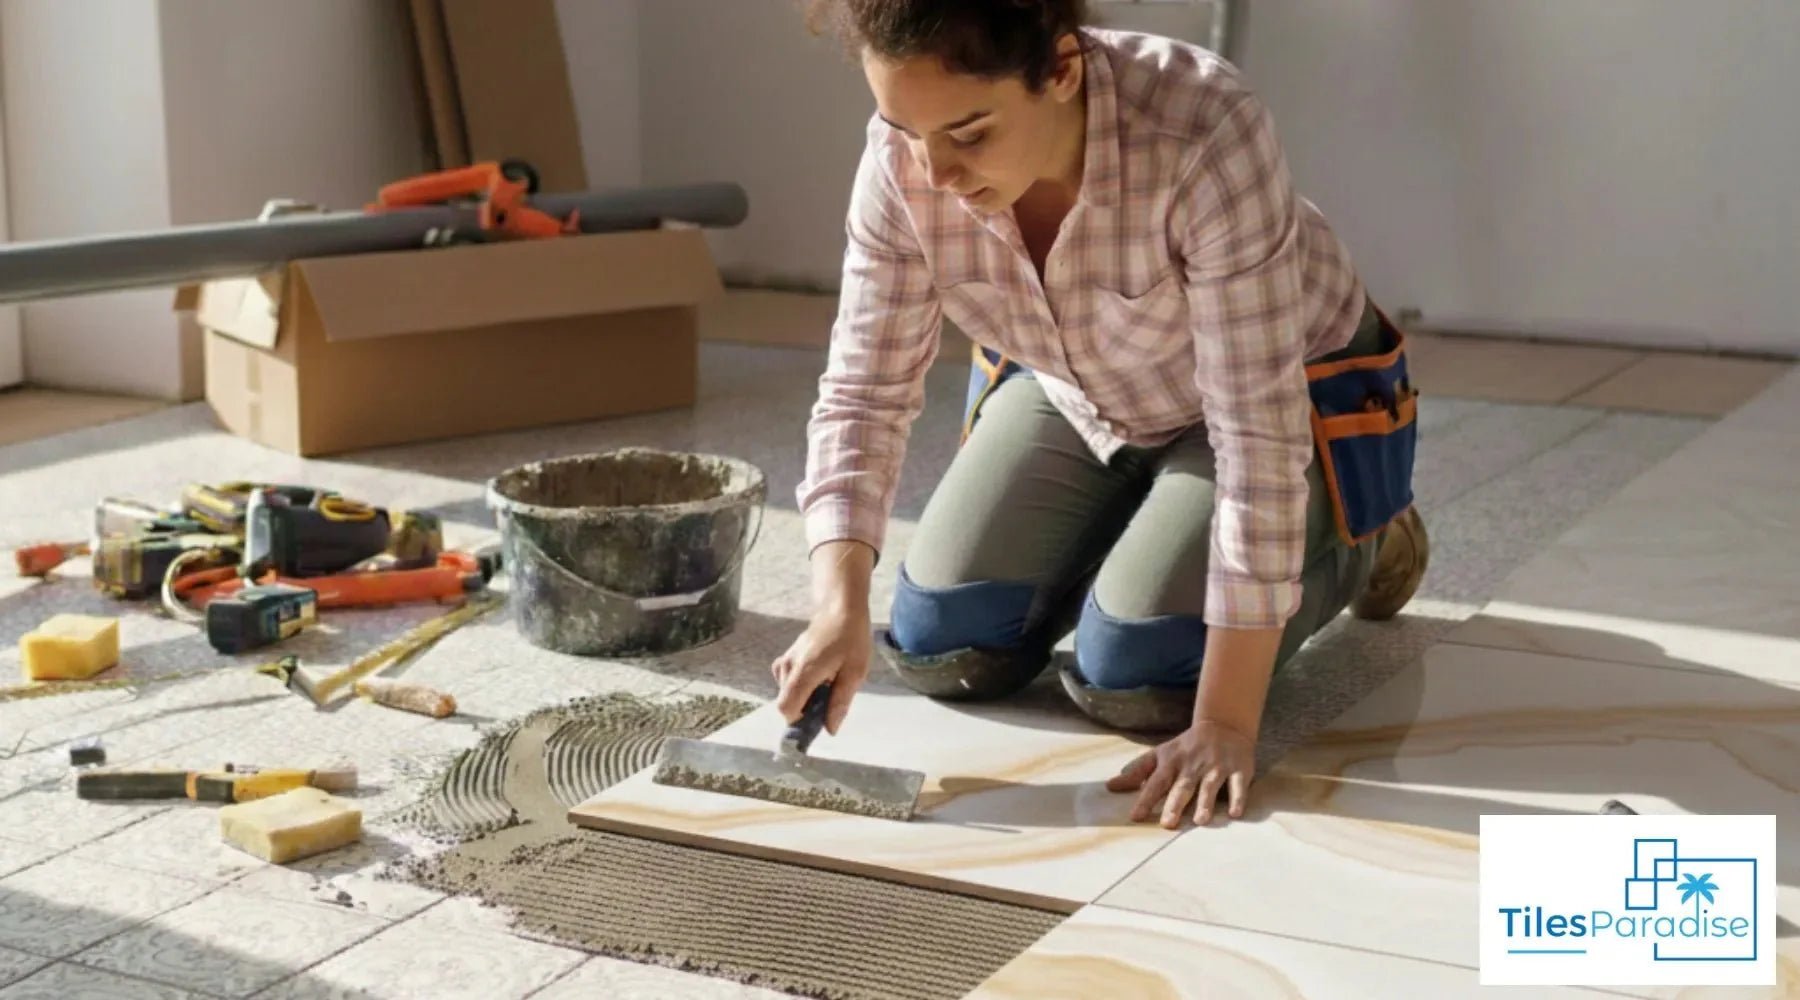
What are the Essential Steps for Tiling Over Tile?
Tiling over existing tile can save significant time and mess, provided the original surface is structurally sound. If the old tiles are loose, hollow, or cracked, they must be removed.

-
Inspect and Assess Suitability: Tap each existing tile with a hard object (like a screwdriver handle). If it sounds hollow or drummy, there are voids beneath, meaning the bond has failed and the tile must be removed. Check the surface flatness with a 2m straightedge; any deviations or dips should be filled with a levelling compound.
-
Clean and Degrease: Use a heavy-duty degreaser or Sugar Soap to remove all grease, soap scum, residues, and sealers. Scrub the tile faces and grout joints thoroughly with a brush, rinse with water, and allow the surface to dry completely to ensure maximum adhesion.
-
Mechanical Abrasion: Roughen the glazed surface sheen of the old tiles using 80–100 grit sandpaper or a grinder. This abrasion is essential for adhesive bonding, giving the new mortar a textured surface to grip.
-
Apply a Bonding Primer: Apply a specialised surface primer. This creates a chemical bridge on non-porous surfaces such as porcelain tiles, significantly increasing bond strength and reducing the risk of debonding.
-
Plan the Layout and Clearances: Dry-lay your tiles to check alignment and cut positioning. Check height accuracy at doors, thresholds, and fixtures to avoid clearance conflicts. For better structural stability, try to offset your new grout joints so they do not sit directly over the old ones.
-
Apply High-Spec Adhesive: Use an S1 flexible tile adhesive to handle movement and load. Apply it with a notched trowel, ensuring 100% coverage to avoid air pockets. For larger tiles, use a twisting motion during placement and back-butter the tile to ensure total bond transfer.
-
Set and Level: Position tiles using tile spacers or levelling systems to maintain joint consistency and eliminate lippage. Use a spirit level frequently to check tolerance control.
-
Grout and Seal: After the adhesive curing period (usually 24 hours), fill the joints with grout using a grout float. Wipe away haze formation with a damp sponge. Finally, apply a flexible sealant to internal corners and movement joints to prevent cracking and moisture staining.
What are the Common Mistakes to Avoid?
To ensure a successful installation, you must avoid these critical procedural omissions that often lead to debonding, lippage, or cracking:
-
Ignoring Substrate Adhesion: Skipping percussion testing (tapping for hollow sounds) is a major error. Loose tiles concentrate point loads and trigger progressive adhesive failure beneath the new tile layer.
-
Exceeding Flatness Tolerances: Failing to confirm a maximum 3 mm deviation over 2 m causes cumulative lippage. Uneven planes increase edge stress and grout fracture frequency.
-
Underestimating Structural Loading: Adding 18–22 kg/m² without checking floor capacity can overload suspended floors. This leads to excess deflection, transferring movement into the adhesive bed.
-
Skipping Surface Abrasion: Bonding onto unabraded glazed tiles reduces adhesive grip. Smooth surfaces prevent a proper key formation for the mortar.
-
Selecting Incompatible Adhesives: Standard-set or non-flexible adhesives lack deformation tolerance. You must use high-specification flexible adhesives to absorb differential movement between layers.
-
Overlooking Moisture Conditions: Tiling over damp substrates traps moisture, which degrades adhesive performance and prevents proper curing.
-
Ignoring Height Constraints: An additional 10–15 mm build-up often disrupts door clearance, appliance fit, and fixture alignment.
-
Rushing Curing Times: Grouting or walking on the surface before a full adhesive cure compromises stability and surface alignment.
What Is The Best Adhesive for Tiling Over Tile?
For tiling over existing tile, the best choice is a high-polymer modified S1 flexible thin-set mortar. This provides the necessary chemical bond to adhere to non-porous surfaces.

Best Professional Options:
-
Mapei Keraflex Maxi S1: The industry standard. It features high polymer content for a superior bond and no vertical slip, making it ideal for both heavy floor tiles and large wall tiles.
-
UltraTile ProFlex SPES: A reliable, cost-effective S1 adhesive with a standard set time, giving you more time to adjust tiles during installation.
-
Mapei Mapeker Rapid: Not an adhesive, but essential. Apply this gritty primer to the old tiles first to create a mechanical key that the new adhesive can grip.
What Are the Alternatives to Tiling Over Tile?
If you want to skip the demo and avoid the bulk of double-tiling, here are the fastest ways to refresh your space:
1. Waterproof Wall Panels
Large sheets that glue directly over old tiles. They are the best for showers because they eliminate grout lines.
-
PVC/MDF: Durable and cost-effective; see Multipanel for tongue-and-groove styles.
-
Acrylic: A high-gloss, glass-like finish for a modern look.
2. Microcement
A thin (2–3mm) polymer-modified coating that creates a seamless, industrial concrete look.
-
Pro: Bonds to almost anything and is 100% waterproof.
-
Source: Specialist kits like those from EPODEX include everything needed for a DIY application.
3. Specialist Tile Paint
The cheapest weekend DIY option to change the colour without changing the texture.
-
Key: Use a high-adhesion paint like Ronseal One Coat Tile Paint to ensure it doesn't peel in humid areas.
4. Vinyl Overlays (Peel-and-Stick)
Ideal for renters or quick splashback updates.
-
Rigid Tiles: Thicker vinyl planks (like WallPops) hide the grout lines underneath better than thin stickers.
-
Click-Lock Vinyl: For floors, these float over your existing tiles without adhesive.
What are the Costs for a Tile-over-Tile Project?
Tile over tile projects generally cost around £110 per m² (inclusive of materials and labor), with labor alone often priced at £20–£40 per m², or £150–£350 per day. This method saves on removal costs (£10–£20 per m²) but requires specialised adhesive/primers to bond new tile over old. Total project costs depend heavily on tile type, room size, and surface preparation.
Estimated Costs for Tile Over Tile Projects
Labor (per m²): £20 – £40
Labor (Per Day): £150 – £350
Total Cost (Including Tiles): ~£110 per m²
Materials (Adhesive/Grout): ~£10 per m²
Final Verdict:
Tiling over tile is a smart, budget-friendly shortcut, provided your foundation is flawless. It’s an ideal solution for those looking to skip the mess of demolition and save roughly 30–50% on project costs.
However, if you're dealing with hollow-sounding tiles, rising damp, or a floor that’s already uneven, you’re just masking a problem that will eventually crack your expensive new finish. In those cases, hacking it out is a pain now, but it saves you a total floor failure later.
The Golden Rule: Always perform a Tap Test with a screwdriver handle first. If it sounds hollow, rip it up. If it sounds solid, grab your high-grip primer and get tiling.