





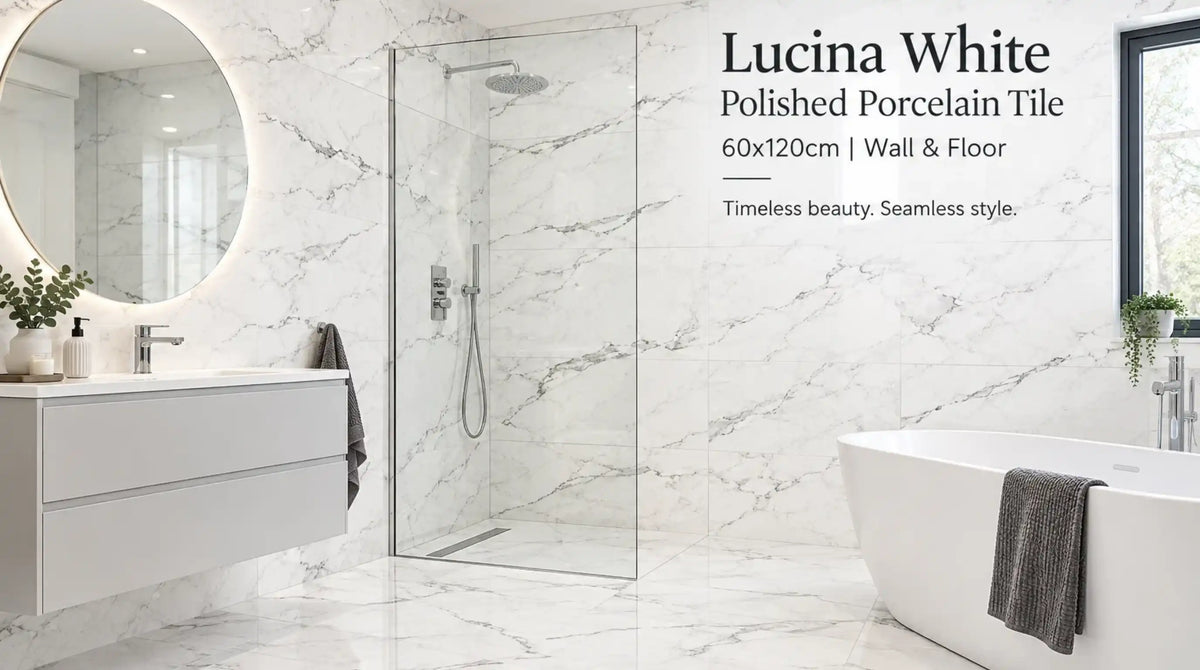
Lucina White is a bright white polished porcelain wall and floor tile with a glossy, light-reflecting surface, soft tonal movement and rectified edges, supplied in 60x60cm and large-format 60x120cm for interior walls and floors, and compatible with underfloor heating.
That sentence answers what the tile is. This guide answers what comes next: which of the two formats is right for your room, why the large format costs more per square metre, exactly how many tiles your room takes once wastage is counted, which adhesive and grout to buy, and the one installation step that ruins more polished white floors than any other.
What Is the Lucina White Polished Porcelain Wall & Floor Tile?
Lucina White is a porcelain tile finished by polishing, which puts it in a different material class from a white ceramic tile and from a white gloss-glazed tile. Three properties define it.
1. The body is porcelain. Clay, feldspar and kaolin are pressed and fired until the silica fuses into a glass phase that fills almost all of the void space. Porcelain is classified under BS EN 14411 Group BIa, the impervious group — which is why Lucina needs no sealing, does not absorb bathroom moisture, and does not lose bond strength over years of wet-room use.
2. The surface is polished, not glazed. A gloss ceramic tile gets its shine from a liquid glaze sprayed on and fired to a glassy skin. Lucina gets its shine from diamond abrasive heads that grind the fired surface flat and then progressively finer until it reflects. The shine is part of the tile body, not a coating sitting on top of it. This is why polished porcelain does not craze and does not show glaze chips along the edges.
3. The edges are rectified. After firing, the tile is mechanically cut on all four sides to an exact dimension. Rectified tiles can be laid to a 2mm joint instead of the 3–5mm a pressed-edge tile needs, and that is what produces the near-seamless white plane large-format polished tiles are bought for.
The face is a bright white with soft tonal movement — not a flat, dead white, and not a veined marble effect. It sits deliberately between the two: enough movement that a large floor does not look printed, little enough that it reads as a plain surface rather than a pattern.
Who this tile is for: anyone who wants maximum reflected light in a room short of daylight, compact bathrooms, internal shower walls, hallways without a window, kitchen splashbacks, feature walls, and open-plan floors where continuity matters more than texture.
Who it is not for: see the finish and safety section, which is deliberately blunt about it.
Is "Lucina" the Same as Calacatta Lucina, Lucid or Lucerne?
No, and this is worth two minutes, because the names collide badly in search and buyers order the wrong thing.
Tile ranges are named, not standardised. Several unrelated products share a similar-sounding name.
|
Name you may have seen |
What it actually is |
Relationship to Lucina White |
|
Lucina White Polished Porcelain |
A bright white polished porcelain wall and floor tile with soft tonal movement, 60x60cm and 60x120cm |
The subject of this guide |
|
Calacatta Lucina |
A Calacatta marble-effect tile — white ground with pronounced grey and gold veining |
Different product. Heavy defined veining, not a soft-movement white field |
|
Lucid Nanoglass White |
A nano-crystallised glass panel, not fired porcelain |
Different material entirely. Nanoglass cuts, drills and edges differently |
|
Lucerne Blanco |
A separate polished porcelain range under a different name |
Different range, different face |
|
Lucina (mythology) |
The Roman goddess of childbirth and light — the origin of the name |
Not a tile. This is why generic "Lucina" searches return encyclopaedia results |
Practical takeaway: when you order, quote the full name and the format — "Lucina White Polished Porcelain Wall & Floor Tile 60x120cm" — or quote the SKU. The two Lucina SKUs are DSL-6393 (60x60cm) and DSL-6395 (60x120cm).
What Does "Polished" Actually Mean on a Porcelain Tile?
Most tile pages treat "polished" as a style word. It is a manufacturing process, and the process explains every quirk of living with the tile.
The polishing line, step by step
-
The tile is pressed and fired to full vitrification.
-
It passes under a sequence of diamond abrasive heads.
-
Each head is finer than the last — typically a dozen or more passes, from aggressive levelling grits down to a mirror grit.
-
The abrasion removes the microscopic peaks of the fired surface until it is optically flat and reflects light specularly rather than scattering it.
What that means for sealing - the honest version
Lucina does not need sealing. The porcelain body is impervious, and polished porcelain is normally nano-sealed on the polishing line as it is made. You are not signing up for an annual maintenance ritual the way you would with a natural marble floor.
There is one nuance that almost every competitor page skips, and it matters on exactly one day of the tile's life.
Polishing grinds away the naturally sealed outer skin of the fired tile and presents a freshly abraded face. The tile is still impervious — but coloured cement grout dragged across a freshly polished surface can key into it and leave a haze that normal cleaning will not remove. That is why a temporary pre-grout sealer is applied before grouting. It is a one-off installation step, not ongoing maintenance, and it is covered in the fitting section.
The rule: polished porcelain is a low-maintenance surface with one high-risk day — grouting day.
The second consequence: acidic cleaners will dull a polished surface over time. pH-neutral only. That applies to every polished porcelain tile on the market, not just this one.
Polished vs semi-polished vs matt
|
Polished (Lucina) |
Semi-polished (lappato) |
Matt |
|
|
Light behaviour |
Specular, mirror-like |
Partial, soft sheen |
Diffuse, no reflection |
|
Perceived room brightness |
Highest |
Medium-high |
Baseline |
|
Shows footprints and water spots |
Most |
Some |
Least |
|
Grip when wet |
Lowest |
Medium |
Highest |
|
Best placement |
Walls, shower walls, dry interior floors |
Family floors |
Wet floors, kitchens, hallways |
Which Lucina Size Should You Choose: 60x60cm or 60x120cm?
Both formats are the same tile, the same face and the same finish. Format changes the finished result more than any other decision you make here, and it changes the price.

60x60cm (600x600mm) - £39.99/m² · SKU DSL-6393
A 600x600mm square is the default domestic format in the UK for good reasons. It is manageable to lift and place single-handed, it cuts economically around standard fittings, and it is far more forgiving of an imperfect substrate.
Choose 60x60cm when:
-
The room is under roughly 8m², where a long rectangle spends too much of its length in cuts
-
The subfloor is timber, or concrete that is not perfectly flat
-
You are fitting it yourself rather than using a tiler
-
You want the lower cost per square metre — it is £8.00/m² cheaper than the large format
Coverage: 2.78 tiles per m² · 0.36 m² per tile
60x120cm (600x1200mm) - £47.99/m² · SKU DSL-6395
A 600x1200mm rectangle halves the number of grout joints compared with 60x60cm. On a bright white polished tile that difference is dramatic, because the grout lines are the only visual interruption in an otherwise continuous reflective plane.
Choose 60x120cm when:
-
You want the near-seamless look polished white is usually bought for
-
The room is open-plan, or a hallway you want to feel longer
-
You are tiling a full-height shower wall — run vertically, two tiles cover most of a standard shower height
-
Your substrate is flat, or you are prepared to level it
Coverage: 1.39 tiles per m² · 0.72 m² per tile
Why does the large format cost more per square metre?
This surprises people, because normally buying bigger units is cheaper. With tiles it works the other way round. Large-format tiles have higher firing rejection rates, need more careful handling through the polishing line, break more often in transit, and require heavier packaging. The premium — £8.00/m² here — is paying for yield and logistics, not for extra material.
What it costs in practice: on a 5m² floor, choosing 60x120cm over 60x60cm adds £40.00 to the tile bill. For most people that is a rounding error against the visual difference. On a 40m² open-plan floor it adds £320.00, and the decision deserves more thought.
How format changes what you actually see
|
60x60cm |
60x120cm |
|
|
Price per m² |
£39.99 |
£47.99 |
|
Tiles per m² |
2.78 |
1.39 |
|
Grout joints in a 10m² floor (2mm, straight lay) |
~34 linear metres |
~22 linear metres |
|
Substrate flatness needed |
3mm over 2m |
2mm over 2m or better |
|
Lippage risk |
Lower |
Higher — levelling clips strongly advised |
|
Handling |
Manageable solo |
Two-person lift |
|
Cut wastage in small rooms |
Lower |
Higher |
|
Perceived room scale |
Neutral |
Visibly larger |
The honest guidance: in a bathroom under 6m², 60x60cm usually gives the better finished result and costs less. In a hallway, an open-plan kitchen, or on a shower wall, 60x120cm wins clearly and is worth the premium.
Full Specification
Published specification
|
Attribute |
60x60cm |
60x120cm |
|
Product name |
Lucina White Polished Porcelain Wall & Floor Tile 60x60cm |
Lucina White Polished Porcelain Wall & Floor Tile 60x120cm |
|
SKU |
DSL-6393 |
DSL-6395 |
|
Material |
Porcelain |
Porcelain |
|
Finish |
Polished — glossy, light-reflecting |
Polished — glossy, light-reflecting |
|
Colour |
Bright white with soft tonal movement |
Bright white with soft tonal movement |
|
Nominal size |
600 x 600 mm |
600 x 1200 mm |
|
Thickness |
— |
8.5 mm |
|
Edge |
Rectified |
Rectified |
|
Tiles per m² |
2.78 |
1.39 |
|
m² per tile |
0.36 |
0.72 |
|
Price |
£39.99 per m² |
£47.99 per m² |
|
Sold by |
Square metre |
Square metre |
|
Suitable for |
Walls and floors — bathrooms, kitchens, living areas |
Walls and floors — bathrooms, kitchens, open-plan spaces |
|
Underfloor heating |
Compatible |
Compatible |
|
Sealing required |
No |
No |
|
External use |
No - interior only |
No - interior only |
Material-class properties (true of porcelain as a class, under BS EN 14411)
|
Property |
Porcelain, Group BIa |
|
Water absorption |
≤ 0.5% by weight |
|
Porosity |
Impervious — no sealing required |
|
Stain behaviour |
Non-porous surface; liquids sit on top rather than soaking in |
|
Chemical behaviour |
Resistant to household cleaners; not resistant to acids |
|
Thermal behaviour |
High conductivity, low expansion — suits underfloor heating |
A note on data we do not publish
The Lucina listings do not carry a tested slip rating, PEI abrasion class, breaking strength figure or a specific water-absorption test result. We would rather say that plainly than quote a number we cannot stand behind.
For a normal domestic bathroom, kitchen or hallway, the finish type tells you what you need — see the next section. If you are specifying for a commercial floor, a rental property, a care setting, or anywhere a slip assessment is required, contact us before ordering and we will obtain the manufacturer's data sheet for the batch. Do not specify a polished tile for a public floor on the basis of a guide article, ours included.
A note on 8.5mm
At 8.5mm the 60x120cm Lucina is thinner than the 10mm most large-format tiles are supplied at. That is a real advantage in two situations — tiling over an existing floor where build-up height matters, and any installation where weight is a constraint — and it carries one requirement: a thinner large-format tile is less tolerant of an uneven substrate. The flatness tolerance in the fitting section is not optional advice for this tile.
Where Should a Polished Finish Be Used and Where Should It Not?
This is the section most retailers skip. It protects your project more than any other part of this guide.

How slip ratings actually work in the UK
R-rating (DIN 51130). A German ramp test. A person in standard work boots walks up an oiled ramp; the angle at which they slip gives the R value, R9 (lowest grip) to R13 (highest). Polished finishes sit at the bottom of this scale as a class, because polishing is the process of removing surface texture, and surface texture is what produces grip.
DCOF (ANSI A326.3). The American dynamic coefficient of friction test, threshold ≥0.42 for level interior floors expected to be walked on wet. You will see this on US-market tiles.
PTV - Pendulum Test Value (BS 7976). This is the test UK building control, the HSE and UK insurers work to, and it is the one that matters here.
|
PTV (wet) |
Slip potential |
|
0–24 |
High |
|
25–35 |
Moderate |
|
36+ |
Low |
If you are specifying for anything other than a private home, ask for the wet PTV. An R-rating alone tells a UK specifier very little.
Where Lucina works, and where it does not
|
Location |
Verdict |
Reasoning |
|
Bathroom and cloakroom walls |
Ideal |
No slip consideration at all; maximum light gain |
|
Shower walls |
Ideal |
Impervious, wipes clean, 60x120cm run vertically covers the height in two tiles |
|
Kitchen splashback and walls |
Ideal |
Wipes clean, no grease absorption |
|
Hallway and living room floor |
Suitable |
Dry-shod traffic. Use a good doormat to keep grit off |
|
Bedroom floor |
Suitable |
Low moisture, low traffic |
|
Open-plan kitchen/diner floor |
Suitable with care |
Fine away from the sink and hob. Consider a matt tile in the wet zone |
|
Bathroom floor, adult household |
With care |
Wet and barefoot. Workable in a household of able-bodied adults using a bath mat, but a matt tile is the safer specification |
|
Wet room floor |
Avoid |
Continuously wet with falls to a drain. Specify a matt anti-slip tile |
|
Walk-in shower floor / tray area |
Avoid |
Same reason |
|
Stairs, steps, thresholds, ramps |
Avoid |
A polished surface at a change of level is the highest-risk configuration there is |
|
Homes with young children or reduced-mobility occupants |
Reconsider for floors |
Use Lucina on the walls and a matt anti-slip tile on the floor |
|
Outdoors — patio, path, balcony |
Never |
Interior tile, not frost-rated, and a polished surface in rain is unsafe |
|
Commercial floors open to the public |
Not without a PTV assessment |
Slip liability sits with the occupier. Ask us for the data sheet first |
The design move that solves this
Run Lucina White up the walls, and put a matt white or light tile on the floor. You keep the brightness where it does the visual work — on the vertical planes at eye level — and you keep grip where the feet are. This is how most professionally specified white bathrooms are actually built, and it is the specification we would give a friend.
Does polished porcelain get more slippery over time?
The surface itself does not degrade. What changes is what sits on it. Soap scum, body oils, cleaning-product residue and limescale each reduce wet grip, and a floor mopped with the wrong product builds a film. Rinse properly with a pH-neutral cleaner and the surface stays as it was on day one.
How Should Lucina White Polished Porcelain Be Fitted?
Polished large-format porcelain is less forgiving than any other tile in a domestic house. The failures are predictable, which means they are all avoidable.
Substrate preparation and flatness tolerance
A rigid tile cannot bend to follow an uneven floor, and a reflective tile shows every step between two tiles because the light catches the edge.
-
Flatness target: 3mm deviation over a 2m straight edge for 60x60cm; 2mm over 2m for the 8.5mm 60x120cm.
-
Concrete: fully cured, dust-free, primed. Correct anything outside tolerance with a self-levelling compound — never with extra adhesive.
-
Timber: overboard with a cement-based tile backer board, mechanically fixed. Plywood alone flexes and will crack the bond line. This matters more at 8.5mm than at 10mm.
-
Movement joints: at all perimeters and at any change of substrate. Never grout a tile hard against a wall.
Adhesive and why the colour matters
-
Use a flexible cement-based adhesive, C2 classification, S1 or S2 deformability. S2 over timber and over underfloor heating.
-
Use a white adhesive, not grey. This is specific to pale tiles and is routinely missed. A grey adhesive behind a bright white 8.5mm porcelain can read through as a faint shadow, particularly on walls under raking light and around cut edges.
-
Apply by the solid bed method with a notched trowel, back-buttering each tile. Target 95%+ coverage on floors. Voids under a large-format tile are where cracks start.
-
Do not use ready-mixed tub adhesive on floors or in wet areas.
Controlling lippage
Lippage is a height difference between adjacent tiles. On a matt tile it is barely visible. On a bright white polished tile the light catches the edge and it looks like a defect.
-
Use a tile levelling clip and wedge system across the whole floor for 60x120cm, and on any floor where you are not confident of the substrate.
-
Check with a long straight edge as you go, not after the adhesive has grabbed.
-
Work in small bays so a tile can still be lifted and re-bedded.
The grouting step that ruins polished white floors
This is the single most common failure on polished tiles. Cement grout is pigmented, and pigment dragged across a freshly polished surface can key in and leave a permanent haze.
-
Lay the tiles. Let the adhesive cure fully — 24 hours minimum, longer in cold conditions.
-
Clean the tile faces completely. Any dust acts as an abrasive in the next step.
-
Apply a pre-grout sealer / grout release made for polished porcelain. Let it cure per the manufacturer's instruction.
-
Grout in small sections — no more than 1–2m² at a time.
-
Sponge off before the grout skins over. Change the water constantly; dirty water re-deposits pigment.
-
Buff with a clean dry microfibre cloth once the surface is dry.
-
If haze appears, treat it within 24 hours with a proprietary cement film remover. After that it becomes very difficult to lift.
If you take one thing from this guide: do not skip the pre-grout sealer on a bright white polished tile with a dark grout.
Cutting and drilling
-
Cutting: a water-fed bridge saw with a continuous-rim diamond blade is the only reliable method for a rectified polished 60x120cm tile. A manual score-and-snap cutter chips polished edges.
-
Score the face, cut from the back where possible, so chipping lands on the hidden side.
-
Drilling: diamond hole cutter, water-cooled, low speed, slow entry angle. Never a percussion drill. Masonry bits shatter the surface.
-
Exposed cut edges: a cut edge is unpolished body and reads matt beside a polished face. Plan cuts to land under skirting, sanitaryware or trims, or use a colour-matched tile trim.
Shade batches, calibre and tone codes
Every box carries a shade (tone) code and a calibre (size) code on the label. Tiles from different production runs vary — subtly, but on a bright white field, visibly.
-
Check that every box in your delivery carries the same shade and calibre code before you open any of them, and before the driver leaves.
-
Dry-lay before fixing. Open at least four boxes and mix tiles across the floor so any variation is distributed rather than concentrated in one corner.
-
Keep your reserve tiles from the same batch. A replacement bought two years later will not match.
Common problems and how to avoid them
|
Problem |
Cause |
Prevention |
|
Grout haze on the polished face |
No pre-grout sealer; grout left too long before sponging |
Seal before grouting, work in 1–2m² sections |
|
Visible lippage catching the light |
Uneven substrate, no levelling clips |
Level the floor first, use clips |
|
Cracked tiles months later |
Voids under the tile, no movement joints |
95%+ coverage, back-butter, perimeter joints |
|
Grey shadow reading through the tile |
Grey adhesive under an 8.5mm pale tile |
Use white adhesive |
|
Patchy colour across the floor |
Mixed shade batches |
Check codes on delivery, dry-lay from several boxes |
|
Chipped cut edges |
Manual snap cutter on rectified polished porcelain |
Wet saw, continuous-rim blade |
|
Dull patches after a few months |
Acidic or abrasive cleaner, or cleaner residue |
pH-neutral only, and rinse |
Which Grout Colour Works Best With Lucina White?
Grout is not a detail. On a bright white tile it is the only line in the composition, and it decides whether the surface reads as a plane or as a grid.
|
Grout choice |
Effect |
Best for |
|
Bright white |
Joints nearly disappear; maximum seamless effect. Matches Lucina's bright white base directly |
Walls, showers, small bathrooms where the surface should read as one plane |
|
Soft off-white / silk |
Joints barely visible, and more forgiving of dirt than a pure white |
Floors, where a pure white joint greys off over time |
|
Light grey |
Joints read as a fine, deliberate line. The practical floor choice |
Hallways, kitchen floors, family bathrooms |
|
Mid / dark grey |
Strong graphic grid, high contrast against the bright white |
Statement walls and geometric layouts — only with a properly applied pre-grout sealer |
|
Black |
Maximum contrast, gallery effect |
Feature walls only. Very high haze risk. Not for a first-time fitter |
Practical rules:
-
Use an epoxy or high-performance cementitious grout in showers and wet areas. Standard cementitious grout in a shower will discolour.
-
Match the silicone sealant to the grout, not to the tile. Sanitary silicone goes in every internal corner and at every junction between two planes — grout cracks there.
-
Keep joints at 2mm. Rectified edges exist so that a narrow joint is achievable; a wider joint throws away what you paid for.
-
The darker the grout, the more disciplined the grouting technique needs to be.

Which Layout Patterns Suit a Bright White Polished Face?
Lucina's face carries soft tonal movement rather than a defined pattern, so the layout is the pattern.
Straight lay (stack bond). Grid-aligned, joints continuous in both directions. Usually the best choice here — it produces the uninterrupted reflective plane the tile is bought for. Requires an accurate set-out, because drift shows immediately along a continuous joint.
Brick bond (offset). Each row offset, softening the grid and disguising minor substrate variation. On 60x120cm use a one-third offset, not a half offset — a half offset on a long large-format tile exaggerates any centre bow and produces visible lippage mid-run.
Vertical stack on walls. 60x120cm run vertically makes a wall read taller. Very effective in shower enclosures and rooms with low ceilings.
Herringbone. Impractical at 60x120cm domestically. Viable at 60x60cm with 15–20% wastage and a skilled fitter.
Half-tiling (walls to 1.1m or 1.2m). Lucina below, painted plaster above. Roughly halves the wall tile cost, keeps the reflective surface where splash happens, and is the most common approach in UK bathrooms.
Lighting: the factor nobody writes about
A bright white polished surface is effectively a low-grade mirror, so it does not have one appearance — it takes on the appearance of whatever is lighting it.
-
Warm light (2700K) pushes a bright white polished tile slightly cream. If your fittings are warm-white LED, get a sample and view it under your own lights before committing.
-
Neutral light (4000K) reads the tile as true bright white. This is what most product photography uses, which is why tiles sometimes look different at home.
-
Cool light (5000K+) pushes it slightly blue and can feel clinical.
-
Direct sun in a south-facing room on a polished white floor produces real glare. In a south-facing kitchen or conservatory, a matt tile is the better call.
-
Downlights aimed at a polished wall create visible hot spots. Wash the wall with indirect or grazing light instead of pointing a spot at it.
Test method: tape the sample to the actual wall or lay it on the actual floor, and look at it at three times of day — morning, mid-afternoon, and at night under artificial light. One £1.99 sample, and an entire order de-risked.
How Do You Clean and Maintain Lucina White?
No sealing schedule, no waxing, no annual treatment. The maintenance requirement is a correct cleaning routine and nothing else.
Routine cleaning
-
Sweep or vacuum first. Grit is the only thing that will scratch a polished porcelain face. Dragging it around with a mop is how fine scratches appear.
-
Mop with warm water and a pH-neutral cleaner, at the stated dilution. Over-dosing leaves a film that dulls the shine and reduces wet grip.
-
Rinse with clean water. This step is skipped more than any other and is the main cause of "my polished floor has gone dull".
-
Buff dry with microfibre. On a polished surface, drying is what produces the shine. Air-drying leaves water spots, especially in hard-water areas.
What never to use
|
Never use |
Why |
|
Acidic cleaners — vinegar, lemon, limescale removers, brick acid |
Etch the polished surface permanently and attack cement grout |
|
Neat bleach left to sit |
Degrades grout and sealant; can discolour coloured grout |
|
Abrasive creams, scouring pads, wire wool |
Scratch the polished face |
|
Regular steam mopping |
Repeated thermal shock and forced moisture into joints. Occasional use is generally tolerated; weekly use is not advised |
|
Wax, polish or "shine restorer" products |
Build a film that traps dirt and makes the floor genuinely slippery |
|
Oil-based soaps |
Leave a residue that dulls and reduces grip |
Specific problems
-
Water spots and limescale bloom (hard-water areas): dry after cleaning. For existing marks use a limescale remover formulated as safe for polished porcelain — never a general household descaler.
-
Footprints and smears: unavoidable on any polished floor. A microfibre buff removes them in seconds. If that will annoy you daily, put Lucina on the walls and a matt tile on the floor.
-
Soap scum on shower walls: squeegee after use, pH-neutral bathroom cleaner weekly.
-
Grout lines greying on a floor: deep-clean with a pH-neutral grout cleaner and a soft brush. Consider a grout protector on floor joints.
-
A dull patch: almost always cleaner residue, not damage. Rinse thoroughly with clean water before assuming the tile is worn.
Is Lucina Compatible With Underfloor Heating?
Yes - both formats are confirmed compatible, and porcelain is one of the best floor coverings for underfloor heating there is.
Why it works: porcelain has high thermal conductivity and low thermal expansion. It transfers heat efficiently into the room rather than insulating against it, and it does not move appreciably as it cycles between warm and cold.
Requirements for a correct installation:
-
Use an S1 or S2 deformable C2 adhesive. A rigid adhesive will fail under thermal cycling.
-
Commission the heating before tiling. Run the system up and back down through a full cycle to cure the screed, then leave it off for at least 48 hours before tiling.
-
Bring the heat back gradually after tiling — off for the adhesive and grout cure period (typically 7 days for a screed system), then raise by no more than about 5°C per day.
-
Maximum surface temperature 27°C, or per the heating manufacturer's specification.
-
Movement joints at perimeters, at doorways, and in any run over about 40m².
-
Both electric mat and wet systems are suitable.
One comfort note specific to polished tiles: a polished surface feels slightly cooler underfoot than a matt one at the same temperature, because it conducts heat away from your foot more efficiently. With underfloor heating running this is irrelevant. Without it, a polished floor will feel cold in a UK winter — which is a genuine argument for fitting underfloor heating alongside it.
Can Lucina White Be Used Outdoors?
No. Lucina is an interior wall and floor tile. Do not fit it outside.
Two independent reasons, either one disqualifying on its own:
1. It is not an external tile. A tile intended for outdoor use must pass freeze-thaw cycling under BS EN ISO 10545-12 and is normally supplied at 20mm thickness with a textured face. Lucina is 8.5mm with a polished face, specified for interior use.
2. A polished surface outdoors is unsafe. In British rain, and under algae growth in shade, a polished face on a patio, path, step or balcony is a genuine slip hazard.
What to use instead: a 20mm external-grade porcelain paver with an R11 textured finish. If you want visual continuity between an indoor Lucina floor and an outdoor terrace, choose a light-toned 20mm outdoor porcelain rather than taking the interior tile outside.
Balconies, covered porches and unheated garden rooms: treat any externally-exposed or unheated space as outdoors, even with a roof over it. Frost does not care about a roof.
How Does Lucina Compare With Matt, Semi-Polished and Marble-Effect White Tiles?
|
Lucina White polished |
Matt white porcelain |
Semi-polished (lappato) |
White marble-effect polished |
Real marble |
|
|
Light reflection |
Highest |
Lowest |
Medium-high |
High |
Medium |
|
Face |
Bright white, soft tonal movement |
Plain |
Plain |
Defined veining |
Unique per slab |
|
Grip when wet |
Lowest |
Highest |
Medium |
Lowest |
Low |
|
Shows footprints |
Most |
Least |
Some |
Most |
Some |
|
Wet floor suitability |
Poor |
Good |
Fair |
Poor |
Poor |
|
Sealing needed |
None |
None |
None |
None |
Yes, periodically |
|
Stain resistance |
Very high |
Very high |
Very high |
Very high |
Low without sealing |
|
Acid resistance |
Surface etches |
Good |
Good |
Surface etches |
Poor — etches readily |
|
Best use |
Walls, shower walls, dry floors |
Wet floors, kitchens, hallways |
Family floors |
Statement walls and floors |
Low-traffic feature areas |
|
Maintenance effort |
Low, with the correct cleaner |
Lowest |
Low |
Low |
High |
The decision, in plain terms
-
Brightest possible room, and you will accept wiping footprints → Lucina White.
-
A white floor you never think about → matt white porcelain.
-
Most of the brightness with more grip → semi-polished / lappato.
-
Visible movement and drama, not a soft field → white marble-effect polished.
-
A genuine natural material you will maintain → real marble, sealed, low-traffic only.
How Many Tiles Do You Need, and What Will the Job Cost?
Coverage
|
Format |
Tiles per m² |
m² per tile |
Price |
|
60x60cm |
2.78 |
0.36 |
£39.99/m² |
|
60x120cm |
1.39 |
0.72 |
£47.99/m² |
Wastage
We recommend adding 10% for cuts and wastage as a baseline. Go higher in these cases:
|
Situation |
Add |
|
Straight lay, simple square room |
10% |
|
Room with alcoves, a bay, or many cuts |
12–15% |
|
Brick bond / offset |
12% |
|
Diagonal |
15% |
|
Herringbone (60x60cm only) |
15–20% |
|
First-time DIY fitter |
+5% on top |
Never order the exact measured area. Tiles break, cuts go wrong, and you want a reserve for repairs years later when the batch no longer exists.
Worked example 1 — a 2.4m × 2.0m bathroom floor
Floor area = 2.4 × 2.0 = 4.80 m²
Add 12% (cuts + alcove) = 4.80 × 1.12 = 5.38 m²
In 60x60cm : 5.38 × 2.78 = 15 tiles → 5.38 × £39.99 = £215.15
In 60x120cm : 5.38 × 1.39 = 8 tiles → 5.38 × £47.99 = £258.19
Difference for the large format = £43.04
Worked example 2 — the same bathroom, walls to 2.1m, one 0.8×2.0m door opening
Wall perimeter = (2.4 + 2.0) × 2 = 8.80 m
Gross wall area = 8.80 × 2.1 = 18.48 m²
Less door opening = 18.48 − 1.60 = 16.88 m²
Add 12% wastage = 16.88 × 1.12 = 18.91 m²
In 60x120cm : 18.91 × 1.39 = 27 tiles → 18.91 × £47.99 = £907.49
In 60x60cm : 18.91 × 2.78 = 53 tiles → 18.91 × £39.99 = £756.21
Worked example 3 — the full bathroom, floor and walls in 60x120cm
Floor 5.38 m² + Walls 18.91 m² = 24.29 m²
Tile cost 24.29 × £47.99 = £1,165.68
Delivery Order exceeds £499 = FREE standard pallet delivery
A useful threshold to know: free standard pallet delivery starts at £499 to UK mainland. In 60x120cm that is 10.4m²; in 60x60cm it is 12.5m². Most full bathrooms clear it comfortably. A floor-only job in a small cloakroom will not — in that case, ordering the wall tiles at the same time can be cheaper overall than paying £39.99 delivery twice.
Budget the whole project, not just the tiles
|
Item |
What to budget |
|
Tiles |
Your area including wastage × £39.99 or £47.99 |
|
Flexible S1/S2 white adhesive |
Roughly one 20kg bag per 4–5m² on floors |
|
Pre-grout sealer / grout release |
One bottle covers most domestic jobs |
|
Grout |
Roughly 0.5–1kg per m² at 2mm joints |
|
Sanitary silicone |
One cartridge per bathroom minimum |
|
Levelling clips and wedges |
Strongly advised for 60x120cm |
|
Tile trims |
For exposed cut edges and external corners |
|
Self-levelling compound |
Only if the substrate is outside tolerance |
|
Tile backer board |
Only over timber |
|
Delivery |
Free over £499, otherwise £39.99 for orders £100–£499 |
|
Labour |
Ask for a per-m² rate; large-format polished carries a premium |
|
Waste disposal |
Broken tiles and packaging are heavy |
Where people overspend and underspend
-
Underspend on adhesive. A cheap rigid adhesive under an 8.5mm large-format polished tile is the most expensive saving in tiling.
-
Underspend on substrate prep. Levelling compound is cheap. Lifting a failed floor is not.
-
Overspend on tile area. Half-tiling walls to 1.1m instead of full height roughly halves the wall cost with no loss of practical performance.
-
Forget the reserve. Ordering 5% extra instead of 12% means a cracked tile in year three has no match — and there are no returns on leftovers, so the reserve is genuinely yours to keep.
Ordering, Samples, Delivery and Returns
Order a sample first. All samples are £1.99, supplied as a 10cm x 10cm cut piece, labelled and wrapped. A maximum of one sample per tile design per customer is allowed online. Because samples are cut sections they may not show the full face of the tile, but they will show you the shade, the finish and the quality — which is exactly what you need to judge under your own lighting. There are no returns on samples.
Order the whole job in one go. Floor, walls and your 10–12% reserve together, so every box comes from the same shade batch.
Delivery. All tile and SPC flooring orders are delivered kerbside on a pallet to UK mainland. The driver cannot bring goods inside or unpack on your behalf — plan for someone to move the pallet.
|
Order value |
Delivery |
Lead time |
|
Over £499 |
Free standard pallet delivery |
2–4 working days |
|
£100 – £499 |
£39.99 standard pallet delivery |
2–7 working days |
Check the delivery before you sign. Tiles travel on pallets and edges are vulnerable. Inspect for damage and confirm shade and calibre codes match across all boxes.
Damage claims. Notify us within 2 working days of delivery for a replacement or refund, with photos taken while the items are still on the pallet. Extended protection increases this to 4 working days for £9.99. Claims cannot be accepted after cutting or installation — so inspect before you start.
Returns. You may cancel your entire order within 14 days of delivery. Returns must be unused, in original packaging and re-saleable. Tile and SPC returns are subject to a handling/restocking fee. There are no returns on leftovers — which is why the wastage calculation above matters.
Bulk, trade and commercial orders. For quantities beyond a single room — developments, hotel and hospitality fit-outs, multi-plot housing — contact us with your room dimensions, the format you need and your programme dates, and we will confirm whether the full quantity can be supplied from a single shade batch, quote a pallet price, and give you a lead time for any balance. For any commercial floor open to the public, ask us for the manufacturer's slip data before you specify a polished tile.
Shop Lucina and Build the Complete Scheme
The Lucina range
-
Lucina White Polished Porcelain Wall & Floor Tile 60x120cm — £47.99/m², 8.5mm, rectified. The large format, for open-plan floors, hallways and full-height shower walls.
-
Lucina White Polished Porcelain Wall & Floor Tile 60x60cm — £39.99/m², rectified. The square format, for bathrooms under 8m² and for anyone fitting it themselves.
Pair the polished wall with the right floor
The safest and best-looking way to use Lucina is on the walls, with a grippier floor beneath it. Browse the matt tiles collection for the floor, and the bathroom anti-slip tiles range if it is a family bathroom. To understand the R-ratings behind that choice before you buy, read Non-Slip Floor Tiles: R-Rating Guide for Bathroom, Kitchen and Outdoor Use in the UK.
A natural floor partner for a Lucina wall is the Statuario Carrara White Matt Anti-Slip Marble Effect Porcelain 60x120cm — same tone family, matt anti-slip face.
If you want a different white polished face
Lucina is a bright white with soft tonal movement. If you want more veining, more warmth or a lower price point, these are the alternatives currently in stock:
-
Onyx White Polished Porcelain 60x120cm Wall and Floor Tile — subtle onyx-style movement
-
Onyx White Polished Porcelain 60x60cm Wall and Floor Tile — the same face, square format
-
Crystal Onyx White Polished Porcelain 60x120cm Wall & Floor Tile — white ground with fine grey veining
-
Ice Onyx Pearl White Polished Porcelain 60x120cm Wall and Floor Tile — a warmer pearl-white base
-
Statuario Carrara White Polished Marble Effect Porcelain 60x120cm — for a defined Carrara vein
-
Artico White Marble Effect Semi-Polished Porcelain 60x120cm — the lappato middle ground if full polish concerns you
Browse the full ranges: White Tiles · Gloss Tiles · White Wall Tiles · White Floor Tiles · Porcelain Tiles
Shop by format
60x120cm Rectangular Large Tiles · 60x60cm Square Medium Format Tiles · 60x120cm Wall Tiles · 60x120cm Floor Tiles · 60x60cm Wall Tiles · 60x60cm Floor Tiles
Shop by room
Bathroom White Tiles · Bathroom Wall Tiles · Bathroom Floor Tiles · White Kitchen Tiles · Kitchen Wall Tiles · Kitchen Floor Tiles · Hallway Tiles
Get the fixing products right
-
Adhesive & Grout — the flexible S1/S2 white adhesive and grout referenced throughout this guide
-
Backer Boards — for tiling over timber
Read next
-
Rectified Porcelain Tiles: Definition, Edge Tolerance & Visual Benefits — why 2mm joints are possible on Lucina
-
Porcelain Tiles: Water Absorption, Slip Rating, Thickness & Size Guide — the standards behind the specification above
-
How to Lay Large Format Porcelain Floor Tiles: Step-by-Step Guide — the full 60x120cm fitting method
-
Large Format Floor Tiles: Sizes and Room-Suitability Guide for UK Homes
-
How to Clean Bathroom Tiles: The Complete Method for Every Tile Type
-
Bathroom Tile Quantities: How to Calculate Walls, Floors, Wastage and Materials
-
How to Choose White Bathroom Tiles: Shade, Size, Finish and Grout
-
White Matt Porcelain Floor Tiles for Kitchens and Bathrooms — the matt counterpart to this guide
-
White Gloss Porcelain Kitchen Wall Tiles: Finish, Size, Grout and Splashback Placement
-
Rossato Onyx Effect Matt Porcelain Wall & Floor Tile: Full Specification Guide